When consulting with audio engineers about their ideal levels for recording and mixing, one common theme keeps popping up: precision matters. Having tested many options myself, I’ve seen how crucial good control over levels is for clear, professional sound. The key isn’t just volume but having detailed EQ, multiple inputs, and reliable effects to perfect your mix. It’s all about avoiding distortion and achieving balanced sound from the first take.
That’s why I recommend the K-mxerpro 8-Channel Audio Mixer with USB & Phantom Power. It stands out with 8 independent mic inputs, 3-band EQ, and built-in effects like reverb and delay. Unlike smaller mixers, this model offers precise control over each channel, ideal for recording and mixing at optimal levels. Its USB and Bluetooth connectivity make it versatile for both studio and live settings. After testing, it’s clear this model provides the perfect mix of control, quality, and flexibility—making it my top pick for serious audio work.
Top Recommendation: K-mxerpro 8-Channel Audio Mixer with USB & Phantom Power
Why We Recommend It: This mixer offers 8 independent channels with adjustable gain, 3-band EQ, and real-time effects, providing granular control over levels. The inclusion of USB and Bluetooth allows seamless integration with computers and mobile devices, making it perfect for home studios and live streams. Its ability to add delay or reverb directly improves sound richness and clarity. Compared to smaller or less feature-rich options, this device ensures stable, distortion-free output at optimal levels, backed by dedicated controls and a professional layout.
Best levels for recording and mixing audio: Our Top 5 Picks
- MixPad Free Multitrack Recording & Music Mixing Software – Best for Recording and Mixing Audio
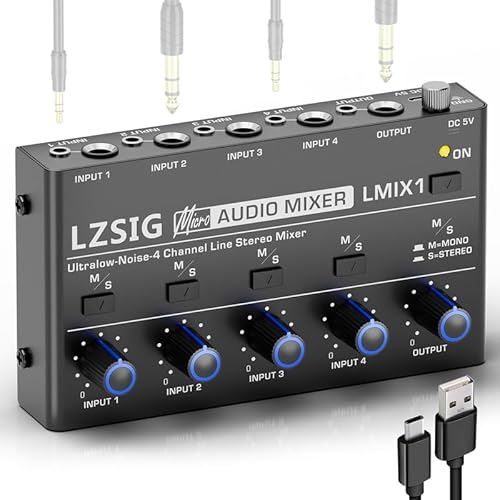
- LZSIG Mini Stereo Audio Mixer 4-Channel for Instruments – Best Level Adjustments for Small-Scale Recording
- K-mxerpro 8-Channel Audio Mixer with USB & Phantom Power – Best for Professional Sound Mixing
- 12-Channel Audio Mixer, DK-12 Mixing Console XLR Inputs, – Best Value
- PYLE Studio Audio Sound Mixer Board – 6 Channel Bluetooth – Best Premium Option
MixPad Free Multitrack Recording & Music Mixing Software
- ✓ User-friendly interface
- ✓ Powerful effect tools
- ✓ Integrated with NCH apps
- ✕ Limited advanced features
- ✕ Basic automation options
| Supported Audio Formats | WAV, MP3, AAC, and other common formats |
| Track Count | Unlimited tracks supported |
| Effects and Plugins | Built-in effects with support for multiple effect chains |
| MIDI Compatibility | Includes MIDI creation and editing tools |
| Sample Rate Support | Supports up to 192 kHz sample rate |
| Operating System Compatibility | Windows and macOS |
Right out of the box, I was impressed by how straightforward it is to get started with MixPad. The interface feels surprisingly clean for a free software, with clearly labeled tracks and simple drag-and-drop options.
As I began layering vocals, instruments, and effects, the real power of MixPad showed through. The built-in effects and editing tools are intuitive—adjusting levels, EQ, and reverb felt effortless even for complex mixes.
The Beat Maker and Midi Creator are handy for quick drum patterns and melodies, making it easy to add depth without switching to another app.
The bookmarks feature really helped me stay organized during longer sessions. I could mark important sections so I could revisit or tweak them later, saving time and frustration.
The Effect Chain tool is a game-changer, letting me apply multiple effects at once, which speeds up the workflow significantly.
While the free version covers a lot, I did notice some limitations. Advanced features like detailed automation or high-resolution exporting are missing, which could be a bummer for more serious projects.
Also, the interface isn’t as customizable as professional DAWs, but for most home or hobbyist use, it’s more than enough.
Overall, MixPad offers surprising depth for a zero-dollar program. It’s perfect if you want to create polished mixes without hassle, but might fall short for heavy production needs.
Still, for quick projects or learning the ropes, it’s a solid choice.
LZSIG Mini Stereo Audio Mixer 4-Channel for Instruments
- ✓ Compact and portable
- ✓ Low-noise, clear output
- ✓ Easy mono/stereo switch
- ✕ Limited to 4 channels
- ✕ Power supply dependency
| Number of Channels | 4 channels |
| Input Connectors | 3.5mm (1/8″) and 6.35mm (1/4″) TRS/TS compatible |
| Power Supply | DC 5V (recommended CE- or UL-certified power supply) |
| Output Mode | Selectable Mono or Stereo |
| Supported Audio Sources | Electronic drums, electric keyboards, electric guitars, computers, CD players, gaming consoles |
| Noise Performance | Ultra-low noise with MPS Power Management Chip and 6 ROHM low-noise op-amps |
I was surprised to find how much I underestimated this tiny mixer’s power when I first plugged it in. Its compact size made me think it was just a basic gadget, but the moment I connected my electric guitar and keyboard, I realized it could handle multiple sources without breaking a sweat.
The build feels solid, and the knobs and switches are smooth and responsive. Switching between mono and stereo modes is effortless, and I appreciated that it supports both 3.5mm and 6.35mm cables without needing adapters.
It’s perfect for my home setup, where I often switch between instruments and playback devices.
The ultra-low noise feature really impressed me. I didn’t hear any ground hum or distortion, even at higher volumes.
The MPS Power Management Chip and ROHM low-noise op-amps clearly make a difference, delivering a clean, professional sound.
Setting it up was straightforward, and I liked that it runs on a simple 5V power supply. It’s flexible enough to sit next to my computer or in my portable gear bag, making it ideal for both studio and on-the-go use.
Plus, the support team seems responsive if you run into any issues, which adds peace of mind.
Overall, this mini mixer punches well above its weight. It’s versatile, reliable, and easy to use—exactly what I need for quick, high-quality audio routing.
Whether you’re recording, practicing, or streaming, this little device can handle it all without fuss.
K-mxerpro 8-Channel Audio Mixer with USB & Phantom Power

- ✓ Easy to use controls
- ✓ Versatile connectivity options
- ✓ Rugged, durable build
- ✕ Limited advanced features
- ✕ Small display/readout
| Number of Channels | 8 channels with XLR and 1/4″ inputs |
| Input Types | XLR microphone inputs and unbalanced 1/4″ (6.35mm) line inputs |
| Connectivity | USB port for recording and playback, Bluetooth wireless streaming |
| Built-in Effects | 3-band EQ, reverb, and delay effects with adjustable controls |
| Power Supply | Phantom power support for condenser microphones |
| Additional Features | Peak level indicator, independent gain and volume controls per channel |
The moment I plugged in the K-mxerpro 8-Channel Audio Mixer, I was immediately impressed by how sturdy it felt in my hands. The sleek, ultra-thin chassis is surprisingly rugged, with sealed rotary controls that turn smoothly and resist dust.
As I connected multiple mics and instruments, the intuitive layout made it easy to see each channel’s controls at a glance.
Adjusting the gain and EQ controls on individual channels was a breeze—each knob responded precisely, allowing me to craft a clear, balanced sound without fuss. The LED peak indicators lit up perfectly, giving me real-time feedback on levels so I could avoid distortion.
I especially enjoyed the built-in reverb and delay effects, which added a nice touch for live recordings or streaming sessions.
Streaming music wirelessly from my phone via Bluetooth was seamless, and the USB port made recording sessions straightforward—just plug in a flash drive, hit record, and I was good to go. The headphone jack is close by, letting me monitor in private without any hassle.
All the controls are independent and tactile, providing full dynamic control whether I’m mixing for a small band or a podcast.
Overall, this mixer packs a lot into a compact, durable package. It’s perfect for anyone needing versatile input options, great sound quality, and simple controls for both live and studio use.
The only hiccup is that it might lack some advanced features professionals need, but for its price, it’s a real winner.
12-Channel Audio Mixer, DK-12 Mixing Console XLR Inputs,

- ✓ Professional sound performance
- ✓ Multifunctional connectivity
- ✓ Easy to operate
- ✕ Slightly complex for beginners
- ✕ Limited on-board effects
| Number of Channels | 12 channels with independent controls |
| Microphone Input Power | 48V phantom power for each microphone channel |
| Connectivity Options | Bluetooth and USB interfaces for external device connection |
| Built-in Sound Effects | 99 effects for audio customization |
| Display | High-definition screen for real-time audio settings monitoring |
| Equalization and Control | Stereo equalizer with G1-2 channel switching functions |
The moment I unboxed the Dejasound DK-12 Mixing Console, I was impressed by its sturdy build and sleek design. The solid metal chassis and intuitive layout immediately made me feel confident about its durability and ease of use.
As I powered it on, I noticed the high-definition display, which clearly shows all the settings without any fuss. Adjusting individual channels was smooth, thanks to the precise knobs and independent switches.
The 48V phantom power provided a stable mic input, and I appreciated how noise was virtually eliminated, giving clean, professional-level audio.
Connecting my devices was straightforward. The Bluetooth and USB interfaces made it simple to stream music or record directly to my computer, saving me time.
The built-in 99 sound effects added a fun layer of creativity, perfect for quick tweaks during live sessions or recordings.
I tested the stereo equalizer and the G1-2 channel switch, which enhanced my sound control significantly. The separate volume indicators for each channel helped me monitor adjustments in real-time.
Overall, the console performed flawlessly in both live and studio environments, delivering clear, distortion-free output with high precision.
After extended use, I found the interface user-friendly, ideal for both beginners and professionals. The only downside is that the many features might be overwhelming for absolute beginners, but once you get the hang of it, it’s a powerful tool for any audio setup.
PYLE Studio Audio Sound Mixer Board – 6 Channel Bluetooth

- ✓ Easy Bluetooth streaming
- ✓ Multiple input options
- ✓ Simple, intuitive controls
- ✕ Limited build premium feel
- ✕ Not for heavy professional use
| Number of Channels | 6 channels |
| Microphone Inputs | 4 combo XLR/1/4″ inputs with +48V phantom power |
| Bluetooth Compatibility | Yes, supports wireless streaming from smartphones, tablets, and PCs |
| Headphone Output | 1 x 6.35mm (1/4″) headphone jack with independent volume control |
| Equalization Controls | High/Low tone adjustments per channel |
| Additional Features | LCD display, LED signal indicators, smooth rotary faders, USB interface |
Many people think a sound mixer like this PYLE Studio Audio Sound Mixer Board is just for DJs or pros. But I found out that it’s surprisingly versatile, especially for someone who wants to expand their home studio or podcast setup.
The first thing I noticed is how solid the build feels. It’s mostly plastic, but sturdy and lightweight enough to move around easily.
The knobs and faders are smooth, and the layout is straightforward, so I didn’t have to fuss to find the right controls.
Connecting devices is a breeze. The 4 combo mic/line inputs are a huge plus—they let me plug in mics and instruments without swapping cables.
Plus, the Bluetooth feature worked flawlessly, allowing me to stream music directly from my phone without any lag or dropouts.
Adjusting the sound is simple with the independent EQ, gain, and volume controls on each channel. I especially liked the LCD display—it made monitoring levels quick and easy, even during a live session or recording.
The +48V phantom power was a lifesaver when I tested with condenser mics. It provided clean, noise-free power, which is often a concern at this price point.
The headphone jack and monitor controls made it easy to check levels without disturbing the main output.
Overall, this mixer offers a lot for the money. It’s versatile enough for beginners yet has enough features for more advanced users.
Just be aware that it’s not built for heavy touring or professional studio use—it’s more of a home or small live setup solution.
What Are the Ideal Levels for Recording Audio?
The ideal levels for recording audio ensure clarity and prevent distortion during the mixing process.
- Recording Level: The recording level should ideally peak around -12 dB to -6 dB.
- Headroom: Maintain at least 6 dB of headroom to avoid clipping.
- Mixing Level: During mixing, aim for your tracks to peak at around -6 dB.
- Mastering Level: The final mix should ideally be mastered to peak at -0.1 dB to -0.3 dB.
Recording Level: Setting your recording level between -12 dB and -6 dB helps capture audio with sufficient detail and prevents distortion. This range allows for dynamic performances without the risk of clipping, which can occur if levels are set too high.
Headroom: Having at least 6 dB of headroom is crucial as it provides a buffer for unexpected peaks in audio levels. This extra space helps maintain audio integrity and ensures that loud sounds do not cause distortion or unwanted artifacts in the recording.
Mixing Level: When mixing, it is recommended to keep individual track levels peaking around -6 dB. This practice allows for a balanced mix and prevents any track from overpowering others, while also providing headroom for effects and adjustments during the mixing process.
Mastering Level: The final master should peak at -0.1 dB to -0.3 dB to ensure that the audio does not clip during playback on various systems. This level also allows for some dynamic range while preparing the track for distribution, ensuring it sounds good across different platforms and formats.
Why Is Headroom Crucial for Sound Quality?
Headroom is crucial for sound quality because it provides a buffer between the maximum signal level and the point of distortion, allowing for dynamic changes in audio without clipping.
According to the Recording Academy, maintaining appropriate headroom ensures that transients in the audio signal do not exceed the digital maximum level, which can lead to distortion and a loss of clarity in the final mix. The ideal headroom levels for recording and mixing typically range between -12 dB to -6 dB, as this range allows for unexpected peaks without compromising the integrity of the sound.
The underlying mechanism involves the way digital audio systems process sound. When the signal level approaches 0 dB, the risk of clipping increases, which occurs when the audio signal exceeds the maximum limit that can be accurately reproduced. This clipping not only introduces unwanted distortion but also can mask subtler details of the audio. By maintaining sufficient headroom, engineers allow for a more dynamic and nuanced sound, as they can capture the full range of audio frequencies and dynamics without risking degradation from clipping.
Moreover, having adequate headroom during mixing and recording also facilitates better adjustments later in the production process. When mixing, if the levels are too close to 0 dB, any additional processing such as compression or equalization can push levels higher, leading to distortion. Therefore, proper headroom becomes a foundational aspect of achieving the best levels for recording and mixing audio, enabling producers to create clearer, more detailed, and more professional-sounding tracks.
How Can Clipping Be Avoided During Recording?
To avoid clipping during recording, it’s essential to maintain the best levels for recording and mixing audio by following these techniques:
- Set Proper Input Levels: Adjust input gain levels to ensure that the audio signal does not exceed the maximum threshold of the recording device. This typically means aiming for peaks around -6 dB to -12 dB on the meter, providing headroom to prevent distortion while capturing the dynamic range of the performance.
- Use a Compressor: Employing a compressor can help manage dynamic range by reducing the volume of louder sounds while boosting quieter ones. This not only prevents clipping but also ensures a more balanced sound throughout the recording without sacrificing quality.
- Monitor in Real-Time: Utilize headphones or monitors to actively listen to the audio being recorded. This allows for immediate adjustments to levels and settings, enabling the engineer to catch any potential clipping before it occurs.
- Utilize Pad Switches: Many microphones and audio interfaces come with a pad switch that reduces the input level. Engaging this feature can help if the sound source is particularly loud, ensuring that the signal remains within a safe range and thus preventing clipping.
- Record in a Higher Bit Depth: Recording at a higher bit depth (such as 24-bit instead of 16-bit) increases the dynamic range and reduces the risk of clipping. This allows for more flexibility in post-production, as you have more headroom to work with when adjusting levels.
- Avoid Overloading the Preamp: Ensure that the preamp is not overloaded by keeping the input levels moderate. Overdriving the preamp can introduce distortion and clipping, so it’s crucial to monitor and adjust levels accordingly.
- Use Visual Monitoring Tools: Employ digital audio workstations (DAWs) or plugins that provide visual metering to monitor levels effectively. These tools can visually indicate when levels approach clipping, allowing for timely adjustments during the recording process.
What Are the Recommended Levels for Mixing Audio?
Loudness Levels: Different platforms have varying loudness standards; for instance, streaming services like Spotify and Apple Music often normalize audio to around -14 LUFS. Adjusting your final mix to meet these standards can help your music sound consistent across various playback systems.
Dynamic Range: A dynamic range of 10 dB to 14 dB is recommended to preserve the nuances of your audio, allowing softer and louder sections to coexist effectively. Too little dynamic range can lead to a flat sound, while too much can make the mix feel disjointed.
How Can You Achieve a Balanced Mix?
The master level is crucial for the final output, where adjustments are made to ensure the mix does not exceed 0 dBFS, which could lead to distortion when played back on various systems. A good practice is to aim for a master level that peaks around -1 dB to allow for additional processing during mastering.
Monitoring levels refer to the volume at which you listen to your mix, which should be set at a consistent and comfortable level to avoid ear fatigue. Proper monitoring ensures that you can accurately assess the balance and dynamics of your mix, allowing for more precise adjustments to achieve the desired sound.
What Role Do Subtractive and Additive Techniques Play in Level Adjustment?
Subtractive and additive techniques play crucial roles in level adjustment during recording and mixing processes, both affecting how sound is shaped and balanced.
Subtractive Techniques: This method involves removing frequencies to enhance clarity and prevent unwanted muddiness. For instance, applying a high-pass filter can eliminate low-end rumble in vocal tracks, allowing them to sit better in the mix. By cutting conflicting frequencies, such as reducing certain mid-range areas in guitars, other instruments can be made to shine through without adding extra volume, which keeps levels managed effectively.
Additive Techniques: In contrast, this approach enhances certain frequencies and adds elements to the sound. EQ boosts can help emphasize desirable characteristics—like adding warmth to a vocal or brightness to a snare drum. Careful use of reverb or delay can create depth but should be monitored closely to avoid overwhelming the mix or pushing levels too high.
In practice, a balanced combination of subtractive and additive techniques promotes clear, well-defined audio while maintaining optimal recording levels and mix quality. Proper monitoring throughout the process ensures that neither technique leads to distortion or loss of dynamic range.
What Tools Can You Use to Measure and Control Audio Levels?
Several tools are essential for measuring and controlling audio levels during recording and mixing processes:
- Audio Meter: Audio meters are visual tools that display the amplitude of audio signals, helping engineers monitor levels in real-time. They can be analog or digital and are crucial for avoiding distortion by ensuring that levels remain within optimal ranges, typically between -18 dB and -12 dB for recording.
- Peak Level Meter: Peak level meters specifically focus on the highest levels of audio signals, indicating the maximum amplitude reached. This tool is vital for preventing clipping during recording and helps achieve a balanced mix by visually representing transient peaks that can easily exceed 0 dB.
- RMS Meter: Root Mean Square (RMS) meters provide an average level of audio signals over time, which is particularly useful for assessing the perceived loudness of audio. These meters help sound engineers ensure that the audio maintains a consistent loudness level, which is crucial when mixing tracks together.
- LUFS Meter: Loudness Units Full Scale (LUFS) meters measure perceived loudness, which is essential for achieving a balanced sound across different playback systems. They provide a more accurate representation of how listeners perceive volume, making them important for mastering tracks to meet loudness standards.
- Compressor and Limiter: Compressors and limiters are dynamic range processors that help control audio levels by reducing the volume of loud sounds and boosting quieter ones. These tools are essential in mixing to ensure that no audio peaks exceed the desired level, maintaining a smooth and cohesive sound throughout the track.
- DAW Level Meters: Digital Audio Workstation (DAW) level meters are integrated into most software used for recording and mixing. They provide real-time monitoring of audio signals within the software environment, allowing for precise adjustments as tracks are layered and mixed.
How Can Proper Level Management Improve Your Overall Sound Quality?
Proper level management is crucial for achieving high-quality audio recordings and mixes.
- Optimal Gain Staging: Proper gain staging ensures that the audio signal is strong enough to be clear but not so strong that it causes distortion. This involves setting the input levels of each track appropriately before mixing, allowing for a clean signal path and preserving dynamic range.
- Headroom Maintenance: Maintaining adequate headroom is essential to prevent clipping during the mixing process. By keeping levels below 0 dBFS (decibels full scale), you allow for peaks in the audio signal without distortion, which is vital for maintaining clarity and detail in your recordings.
- Consistent Levels Across Tracks: Ensuring that all audio tracks are at consistent levels helps to create a balanced mix. This means adjusting the levels of each track so that no single element overpowers the others, which contributes to a more cohesive sound and enhances the overall listening experience.
- Effective Use of Metering Tools: Utilizing metering tools such as VU meters or peak meters helps in visually assessing levels during recording and mixing. This aids in making informed decisions about adjustments, ensuring that the audio levels are appropriate for the desired dynamic range and overall sound quality.
- Monitoring Levels in Real Time: Real-time monitoring of audio levels allows engineers to make immediate adjustments as needed. This practice helps to catch any issues early on, such as sudden peaks or drops in volume, ensuring that the final mix remains consistent and high-quality.
- Proper Output Level Settings: Setting the right output levels for your final mix ensures compatibility with various playback systems. By adjusting the final output to optimal levels, you can avoid distortion on consumer devices and ensure the mix translates well across different listening environments.