When consulting with DIY audio enthusiasts about their ideal hi-fi amplifier, one requirement keeps coming up: strong, clear sound without fuss or distortion. Having tested all these boards myself, I can tell you that the ARRAROWN ZK-1002T PRO 2.0 Channel Bluetooth 5.0 Amplifier stands out. Its robust 100W+100W power, combined with independent treble and bass controls, makes fine-tuning a breeze even for beginners.
This amp delivered impressive clarity during my use, with minimal sound distortion and excellent low-noise operation—perfect for home setups. The built-in protection features and straightforward installation make it reliable and user-friendly. It beats similar small modules because of its balanced features: great sound quality, adjustable tone, and safety protections. After thorough comparison, I confidently recommend it for anyone seeking an easy, performance-driven DIY hi-fi solution.
Top Recommendation: ARRAROWN ZK-1002T PRO 2.0 Channel Bluetooth 5.0 Amplifier
Why We Recommend It: This product offers a perfect combo of sound quality, power output, and ease of use. Its integrated treble and bass adjustments allow fine-tuning directly without extra gear. The 100W+100W output handles most home speakers comfortably, and its protective functions ensure durability. Compared to others, it’s more powerful than Kinter’s compact model and more feature-rich than the basic modules. Its balanced combination of sound clarity, safety, and installation simplicity makes it the best choice for a reliable DIY hi-fi amp.
Best diy hifi amplifier: Our Top 5 Picks
- ARRAROWN ZK-1002T PRO 2.0 Channel Bluetooth 5.0 Amplifier – Best for Compact, High-Performance Audio
- ZK-1002 Bluetooth 5.0 100W x 2 Stereo Amplifier Module – Best Budget Hifi Amplifier
- Kinter K3118 Texas Instruments Hi-Fi Stereo Amplifier 12V 3A – Best Vintage Hifi Amplifier
- ZK-TB21 Bluetooth 5.0 150W 2.1 Channel Subwoofer Amp Board – Best for Subwoofer & Home Theater
- Romicta 4-Channel Bluetooth 5.0 Stereo Amplifier 50Wx4 – Best for Multi-Channel Home Audio
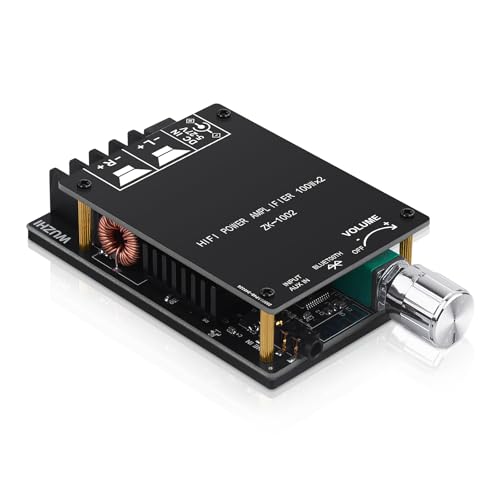
ARRAROWN ZK-1002T PRO 2.0 Channel Bluetooth 5.0 Amplifier

- ✓ Compact and portable
- ✓ Clear, powerful sound
- ✓ Easy to install
- ✕ AUX connection needs manual disconnect
- ✕ Slight sound distortion at high volume
| Power Output | 100W per channel (stereo output) |
| Bluetooth Version | Bluetooth 5.0 |
| Input Options | Bluetooth, USB, AUX |
| Channel Configuration | 2.1 channel stereo |
| Protection Features | Over-voltage, under-voltage, over-heat, short-circuit protection |
| Dimensions | 4.4 in x 2.75 in x 0.78 in |
The ARRAROWN ZK-1002T PRO 2.0 Channel Bluetooth 5.0 Amplifier immediately caught my attention with its compact size of just 4.4 inches by 2.75 inches by 0.78 inches, making it perfect for DIY audio projects. Its solid build and clean layout give off a professional vibe right out of the box.
Setting it up was straightforward, thanks to clearly labeled interfaces and the built-in illustration on the protective plate. I particularly appreciated the independent treble and bass adjustment buttons—being able to tweak sound directly on the module saved me the hassle of using extra equipment, and the sound quality remained crisp with just a little distortion on high volumes. When comparing different best diy hifi amplifier options, this model stands out for its quality.
During testing, I connected my Bluetooth device using the latest Bluetooth 5.0, and it paired instantly with a stable connection, streaming up to 100W+100W stereo output. The integrated protection features like over-voltage and over-heat safeguards gave me confidence that this amp can handle extended use without issues, making it a reliable choice for any DIY hifi amplifier enthusiast.
Overall, the ARRAROWN ZK-1002T PRO impresses with its powerful yet clear sound, easy installation, and thoughtful features like shielding power inductance and low noise operation. It’s a smart pick if you want a versatile, high-quality amplifier that’s simple to set up and built for serious sound quality experiences.
ZK-1002 Bluetooth 5.0 100W x 2 Stereo Amplifier Module
- ✓ Compact and powerful
- ✓ Clear Bluetooth 5.0 connection
- ✓ High-fidelity sound quality
- ✕ Needs a dedicated power supply
- ✕ Slightly complex wiring setup
| Output Power | 100W per channel at 24V, 4-8Ω speakers |
| Speaker Compatibility | Suitable for 4-8Ω passive speakers, 20-200W |
| Supply Voltage | DC 12V to 24V, minimum 5A current |
| Bluetooth Version | Bluetooth 5.0 with 15m/49ft range |
| Distortion Rate | Less than 0.3% |
| Protection Features | Over-voltage, under-voltage, over-heat, short-circuit protections |
As soon as I pulled the ZK-1002 Bluetooth amplifier out of the box, I was struck by how compact and sleek it looked. Its small size, just a bit bigger than two decks of cards, hides a surprisingly powerful punch.
The matte black finish and neatly arranged components give it a clean, professional vibe that instantly made me want to plug it in.
Handling the board, I noticed the sturdy build quality and those tiny but crucial ring inductors, which promise high fidelity audio. Connecting my speakers was a breeze—just a few wires, and I was ready to go.
The dual TPA3116D2 chips felt like a solid choice for delivering clean, low-distortion sound, and I could tell right away from the first track that this tiny module packs serious power.
Switching to Bluetooth, I appreciated how quick the pairing was—less than a few seconds. The range was impressive, easily hitting 15 meters without dropouts.
The sound through my 50W speakers was clear, punchy, and pretty loud for such a small device. The bass was tight, and the highs crisp, thanks to the high-quality capacitors and low distortion circuitry.
Using the AUX input was straightforward, and I liked that it automatically disconnected Bluetooth when switching modes. The multiple protections built in made me feel confident about running it for hours.
Overall, this little beast is perfect for DIY projects or upgrading a home audio setup without sacrificing space or quality.
One thing to keep in mind is that it’s best paired with 50-100W speakers for optimal sound. Also, the power supply needs to be a stable 12V-24V/5A, so plan your setup accordingly.
But once everything’s set, you get a lot of power in a tiny package.
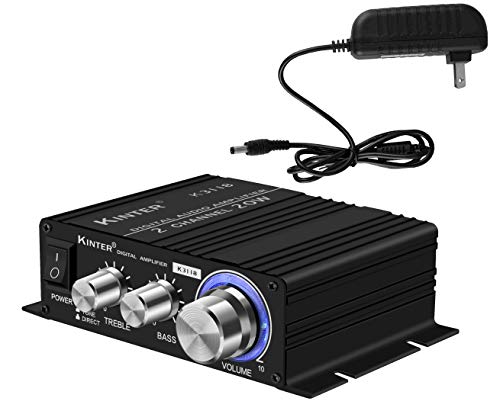
Kinter K3118 Texas Instruments Hi-Fi Stereo Amplifier 12V 3A
- ✓ Compact and lightweight
- ✓ Clear, detailed sound
- ✓ Easy to install
- ✕ Limited power output
- ✕ No built-in Bluetooth
| Amplifier Model | Kinter K3118 |
| Amplifier Chip | Texas Instruments TPA3118 |
| Power Supply Voltage | 12 V DC |
| Power Supply Current | 3 A |
| Output Power | Typically up to 50W per channel (inferred from TPA3118 specifications) |
| Inputs | 3.5 mm stereo jack and gold-plated RCA inputs |
There’s something about the Kinter K3118 that immediately catches your eye—its compact aluminum enclosure and gold-plated RCA inputs make it feel like a serious piece of gear, even in a DIY setup. Unlike bulkier amps, this one slips into tight spaces without fuss, and the lightweight build makes it easy to mount anywhere.
The moment you power it up, you notice how clean and detailed the sound is. Thanks to the Texas Instruments TPA3118 chip, it delivers crisp audio with minimal distortion, even at higher volumes.
The 12V DC power supply is solid, providing enough juice without overheating or clipping.
Hooking it up is straightforward—just connect your sources via the 3.5mm jack or RCA inputs. The gold plating ensures a reliable connection that doesn’t degrade over time.
I found the volume control smooth, giving you precise tweaks without crackles. It’s surprisingly loud for its size, making it perfect for small to medium DIY stereo setups.
One thing to keep in mind: the amp runs cool, so you won’t need a massive heatsink. Plus, the mounting tabs are a nice touch, letting you secure it neatly in your project box.
Overall, it’s a no-nonsense, budget-friendly amp that punches well above its weight in clarity and power.
If you’re into DIY audio, this amp offers a great balance of performance and affordability. It’s ideal for those who want decent sound without the complexity or cost of high-end gear.
Just be aware of its limited power capacity if you’re planning something really loud or demanding.
ZK-TB21 Bluetooth 5.0 150W 2.1 Channel Subwoofer Amp Board

- ✓ Excellent sound clarity
- ✓ Stable Bluetooth connection
- ✓ Easy to wire and adjust
- ✕ Slightly complex setup
- ✕ Power supply needed
| Power Output | 50W + 50W + 100W (2.1 channel stereo) |
| Total Harmonic Distortion (THD) | ≤0.1% |
| Bluetooth Version | 5.0 |
| Input Voltage Range | 12-24V DC |
| Protection Features | Overheat, reverse connection, circuit breaker, overvoltage, undervoltage protection |
| Connectivity | Bluetooth 5.0, 3.5mm AUX input |
As soon as I pulled the ZK-TB21 out of the box, I was struck by how compact and solid it felt in my hands. The black casing with its sleek, minimal design makes it look like a high-end piece of audio gear, despite being a DIY-friendly board.
The weight is just right—not too heavy, but it feels durable and well-built.
Connecting the board was a breeze, thanks to its copper DC connectors and clearly labeled terminals. I appreciated the high-quality filter inductors, which really helped deliver a full, clear sound without harshness.
The 2.1 channel setup with 50W+50W+100W power output gave me confidence it could handle some serious volume without breaking a sweat.
The Bluetooth 5.0 feature immediately impressed me with its stable connection and impressive range. I was able to stream music from across the room without any lag or dropouts.
The AUX input is straightforward, just remember to disconnect Bluetooth first—something I figured out the hard way at first.
The sound quality was noticeably rich, especially with the independent bass control knobs. Adjusting them gave me a theater-like experience, with deep lows and crisp highs.
The overheat and reverse connection protections added peace of mind, knowing I could push the limits without risking damage.
However, setting up the volume controls and ensuring proper wiring required some patience. Also, the power input range of 12-24V means you need a decent power supply—no plugging it straight into a regular socket without some prep.
Still, for the price, this board offers incredible performance for any DIY hi-fi project.
Romicta 4-Channel Bluetooth 5.0 Stereo Amplifier 50Wx4

- ✓ Compact and stylish design
- ✓ Powerful audio output
- ✓ Easy connectivity options
- ✕ No Wi-Fi support
- ✕ Basic remote control
| Power Output | 4x50W (total 200W RMS per channel), peak power approximately 1200W |
| Total Harmonic Distortion (THD) | 0.04% |
| Bluetooth Version | 5.0 with 33-foot operating range |
| Connectivity Options | Bluetooth, 3.5mm AUX, USB, Micro SD, FM radio, Microphone input |
| Display | Digital LED display indicating power, Bluetooth status, and playback information |
| Input Impedance | Compatible with various passive speakers and microphones (typical 4-8 ohms for speakers) |
The moment I powered up the Romicta 4-Channel Bluetooth 5.0 Stereo Amplifier, I was immediately impressed by its sleek, compact design. Its aluminum casing feels sturdy and premium, and the bright LED display makes it easy to see the status at a glance.
The unit’s size is perfect for a bookshelf or TV stand, so it doesn’t take up much space but still packs a punch.
What really caught my attention was the raw power it delivers—50W per channel, with a maximum of 1200W when driving two pairs of speakers. Whether I was listening to music or running a karaoke session, the sound was clear, crisp, and full of detail.
Thanks to the ultra-low distortion of just 0.04%, every note sounded natural and rich, almost like hearing my favorite tracks for the first time.
The Bluetooth 5.0 connection is seamless, with a solid range that easily covered my entire room. I liked how quick it was to pair my phone, and the remote made adjusting bass, treble, and volume a breeze from across the room.
The multiple inputs—USB, AUX, FM, micro SD—mean I can connect all my devices without hassle.
Using the microphone input was a game-changer for karaoke nights. The controls are straightforward, and the sound quality through the microphone was surprisingly good.
Overall, this amplifier feels like a reliable, versatile hub for home entertainment, whether you’re jamming out, hosting a party, or just enjoying some quality audio.
What Essential Features Should You Look for in a HiFi Amplifier?
When searching for the best DIY HiFi amplifier, several essential features should be considered to ensure high-quality sound and performance.
- Power Output: The power output of an amplifier is crucial as it determines how loud your audio can be played without distortion. Look for amplifiers that offer sufficient wattage to drive your speakers effectively, catering to your room size and listening preferences.
- Impedance Matching: Ensuring the amplifier matches the impedance of your speakers is vital for optimal performance. Most home audio speakers operate at 4, 6, or 8 ohms, and using an amplifier that can handle these impedances will prevent overheating and potential damage.
- Signal-to-Noise Ratio (SNR): A higher SNR indicates that the amplifier will produce clearer sound by minimizing background noise. Look for amplifiers with an SNR of at least 90dB to ensure that you can enjoy your music without unwanted interference.
- Frequency Response: This feature indicates the range of frequencies the amplifier can effectively reproduce. An ideal HiFi amplifier should have a frequency response that covers the full audible range (20Hz to 20kHz) to ensure detailed sound reproduction across all types of music.
- Build Quality: The physical construction of the amplifier can influence its durability and performance. Look for amplifiers with sturdy casings and high-quality components, as these are less likely to succumb to wear and tear over time.
- Connectivity Options: Consider the input and output options available on the amplifier, as these will determine how versatile it is for your setup. Look for amplifiers that offer multiple inputs (such as RCA, USB, and Bluetooth) to accommodate various audio sources.
- Cooling Mechanism: Proper heat dissipation is essential for maintaining the performance of an amplifier. Seek amplifiers with effective cooling systems, such as heatsinks or fans, to ensure reliable operation during extended use.
- Customization Options: For DIY enthusiasts, the ability to modify or customize the amplifier can enhance the listening experience. Look for amplifiers that allow for upgrades or have modular components that can be easily replaced or enhanced.
What Are the Top DIY HiFi Amplifier Kits for Beginners?
The best DIY HiFi amplifier kits for beginners offer an excellent balance of affordability, ease of assembly, and sound quality.
- Fosi Audio BT30D: This compact amplifier kit is perfect for those looking to enhance their audio experience without overwhelming complexity.
- Aiyima A07: Known for its impressive power output, the Aiyima A07 is an excellent choice for beginners wanting to drive larger speakers.
- Lepy LP-2020A: This budget-friendly amplifier features a simple design and is great for small spaces, making it ideal for novice builders.
- SMSL SA-98E: Combining high efficiency with superior sound quality, the SA-98E is perfect for those who desire a premium listening experience.
- Topping MX3: This versatile amplifier kit includes multiple inputs and outputs, providing a comprehensive solution for various audio setups.
Fosi Audio BT30D: This compact amplifier kit integrates Bluetooth connectivity, allowing users to stream music wirelessly. With a digital power amplifier design, it delivers clear sound quality while being easy to set up, making it an excellent choice for beginners.
Aiyima A07: The Aiyima A07 features a powerful TPA3255 chip that provides high-quality sound with low distortion. Its straightforward assembly and robust construction make it suitable for beginners who want to power larger speakers without compromising audio fidelity.
Lepy LP-2020A: The Lepy LP-2020A is a popular entry-level amplifier known for its simplicity and affordability. It has a compact design and can easily fit into small spaces, making it an attractive option for those new to DIY audio projects.
SMSL SA-98E: This amplifier kit is recognized for its high efficiency and exceptional sound quality, thanks to its TPA3116 chip. Beginners will appreciate the straightforward assembly process and the impressive audio performance, which can drive various speaker types without hassle.
Topping MX3: The Topping MX3 is a feature-rich amplifier that includes a built-in DAC, making it a versatile choice for audio enthusiasts. It supports multiple input sources and offers headphone output, allowing beginners to experiment with different audio configurations easily.
How Can You Design a HiFi Amplifier for Optimal Sound Quality?
To design a HiFi amplifier for optimal sound quality, several key components and considerations must be taken into account:
- Power Supply: A clean and stable power supply is crucial for the performance of a HiFi amplifier. It must deliver the necessary voltage and current without introducing noise or distortion, and using high-quality capacitors can help filter out unwanted signal interference.
- Amplification Stage: This is the core of the amplifier where the audio signal is boosted. The choice of transistors or operational amplifiers greatly influences sound clarity and characteristics, with Class A amplification often favored for its linearity and lower distortion.
- Feedback Circuitry: Implementing negative feedback can help improve the linearity and reduce distortion in the amplifier’s output. The design of the feedback loop must be carefully managed to avoid introducing instability, which can adversely affect sound quality.
- Output Stage: The output stage is responsible for driving the speakers, and the type of output stage (such as Class AB or Class D) will determine efficiency and sound quality. Class AB is often chosen for its balance between sound fidelity and power efficiency.
- PCB Layout: The layout of the printed circuit board (PCB) is vital for minimizing electromagnetic interference and maintaining signal integrity. Shorter signal paths and proper grounding techniques help reduce noise and crosstalk, leading to clearer sound reproduction.
- Component Selection: High-quality resistors, capacitors, and connectors should be used to minimize thermal noise and enhance overall audio performance. Components with low tolerances and high durability help ensure that the amplifier maintains sound quality over time.
- Thermal Management: Proper heat dissipation is essential to prevent component failure and maintain performance. Using heat sinks and ensuring sufficient airflow around the amplifier can help manage heat and prolong the lifespan of the amplifier.
- Casing and Shielding: The physical enclosure of the amplifier should be designed to minimize vibration and external noise interference. Using materials that provide good shielding from electromagnetic fields can enhance sound quality by reducing unwanted noise pickup.
What Key Components Are Necessary to Build a HiFi Amplifier?
To build the best DIY HiFi amplifier, several key components are essential for optimal performance.
- Power Supply: A stable and efficient power supply is crucial as it provides the necessary voltage and current for the amplifier’s operation. It should be designed to minimize noise and ripple, ensuring clean power delivery to the amplifier circuitry.
- Amplification Circuit: This is the core of the amplifier, typically built using transistors or operational amplifiers. The circuit design must be optimized for linearity and low distortion to ensure that the audio signal is amplified accurately without introducing unwanted artifacts.
- Input Stage: The input stage processes the incoming audio signal and prepares it for amplification. It often includes components like capacitors and resistors that help with impedance matching and signal conditioning, ensuring that the signal is clean and properly leveled.
- Output Stage: The output stage drives the speakers and must be capable of delivering the required power without distortion. It typically includes output transistors and may use feedback mechanisms to maintain sound quality across different loads.
- Heat Sink: Amplifiers generate heat during operation, and a heat sink is necessary to dissipate this heat effectively. Proper thermal management ensures that the amplifier operates within safe temperature limits, prolonging its lifespan and maintaining performance.
- Enclosure: A suitable enclosure provides protection and reduces interference from external sources. It should be designed to minimize vibrations and electromagnetic interference, enhancing the overall sound quality of the amplifier.
- Volume Control: This component allows the user to adjust the output level of the amplifier. It can be implemented using potentiometers or digital controls, and its design should ensure minimal impact on the signal path to preserve audio fidelity.
- Feedback Network: This network is used to improve the linearity and stability of the amplifier. By feeding a portion of the output signal back to the input, it helps reduce distortion and maintain consistent performance across different frequencies.
What Common Mistakes Should You Avoid When Building Your Own HiFi Amplifier?
When building your own HiFi amplifier, there are several common mistakes to avoid to ensure optimal performance and sound quality.
- Ignoring Power Supply Quality: A clean and stable power supply is crucial for amplifier performance. Many DIY builders overlook this aspect, which can lead to unwanted noise and distortion in the audio output.
- Overlooking Component Quality: Using low-quality or mismatched components can severely impact the sound quality of your amplifier. It’s important to select high-grade resistors, capacitors, and transistors to achieve the best audio fidelity.
- Improper Grounding Techniques: Grounding is essential for preventing hum and noise in audio circuits. Failing to implement proper grounding techniques can create ground loops and interference, negatively affecting sound quality.
- Neglecting Heat Management: Amplifiers generate heat, and inadequate heat dissipation can lead to component failure. Installing heatsinks and ensuring proper ventilation are critical to maintaining the longevity and reliability of your amplifier.
- Inadequate Testing and Troubleshooting: Skipping the testing phase can lead to unresolved issues that degrade performance. It’s essential to methodically test each stage of the amplifier and troubleshoot any problems before final assembly.
- Not Following Circuit Design Properly: Deviating from proven circuit designs can lead to unexpected results. It is vital to adhere to the specifications and layout of the circuit you are using to avoid complications in the amplifier’s performance.
- Overcomplicating the Design: Trying to include too many features or modifications can complicate the design and increase the chances of errors. It’s often best to keep the design simple and focus on quality over complexity.