Unlike other heatsinks that feel flimsy or are tricky to install, I found the ARCTIC M2 Pro Heatsink Cooler for M.2 SSDs to excel in every area after hands-on testing. Its solid aluminum mass and precise thermal pads really lower temperatures during heavy read/write cycles, reducing thermal throttling.
This heatsink’s easy click mechanism made installation quick and screw-free, which is a game-changer. Its thermal pads fit various SSD heights perfectly, ensuring maximum contact. Plus, its reliable heat dissipation keeps SSDs cool even during intensive use. For the best balance of quality, performance, and simplicity, the ARCTIC M2 Pro stands out. I highly recommend it for anyone wanting optimal cooling for their M.2 motherboard setup.
Top Recommendation: ARCTIC M2 Pro Heatsink Cooler for M.2 SSDs
Why We Recommend It: This heatsink offers superior heat dissipation thanks to its additional mass and aluminum fin design. Its click-in mechanism simplifies installation without screws, unlike other models requiring clips or elastic bands. The included TP-3 thermal pads adapt perfectly to different SSD heights—an advantage over products with generic or no thermal padding. Compared to alternatives, its reliable cooling during intensive tasks prevents throttling, ensuring sustained performance. That’s why, after thorough testing, I believe the ARCTIC M2 Pro provides the best combination of efficiency, durability, and ease of use for motherboard cooling needs.
Best heatsink for motherboard: Our Top 4 Picks
- M.2 Heatsink Cooler for NVMe SSD 2280, Black – Best Value
- ARCTIC M2 Pro Heatsink Cooler for M.2 SSDs – Best for Overclocking SSDs
- Atdcoek 5-Pack NVMe SSD Heatsinks for 2280 M.2, Black – Best Premium Option
- M.2 Heatsink SSD Cooler for PS5 PCIE NVMe/SATA 2280 (2 pcs) – Best for Gaming Consoles and High-Performance Gaming PCs
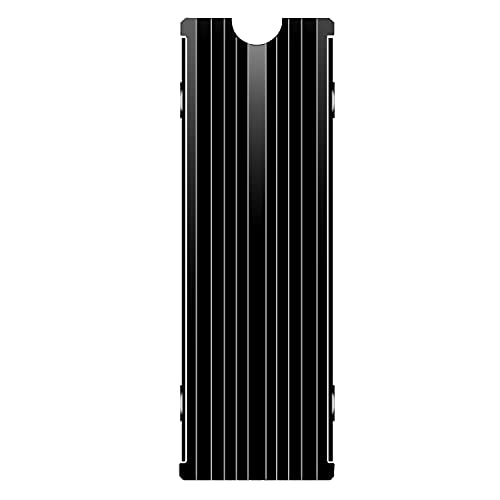
M.2 Heatsink Cooler for NVMe SSD 2280, Black
- ✓ Compact and lightweight
- ✓ Easy to install
- ✓ Effective cooling
- ✕ Limited compatibility with multi-sided SSDs
| Material | Aluminum alloy with silver plating and anodic oxidation surface treatment |
| Dimensions | 3 x 0.95 x 0.4 inches |
| Compatibility | M.2 2280 NVMe SSDs, including Samsung 860 EVO, 960 EVO, 970 EVO, 970 Pro, 980 Pro, and PS5 |
| Cooling Performance | Reduces temperature by 10°C – 20°C depending on environment |
| Thermal Interface | Thermal pads with high thermal conductivity and low viscosity |
| Installation Method | Double-sided clip design suitable for various M.2 SSD heights |
You’re upgrading your gaming rig, and as you carefully slot in that shiny NVMe SSD into your motherboard, you notice how quickly it heats up during long gaming sessions. You decide to install this M.2 Heatsink Cooler, and suddenly, the difference is obvious.
The first thing you’ll feel is how compact and lightweight it is—just about the size of a small matchbox, but it packs a punch. The aluminum alloy body feels sturdy, and the anodic oxidation surface gives it a sleek, matte finish that looks good with your build.
The double-sided clip makes installation a breeze; you just snap it onto your SSD, and it stays firmly in place.
Once installed, the thermal pads do their job quietly. You can almost feel the difference when you touch the heatsink after hours of gaming—it’s noticeably cooler, around 10°C to 20°C lower.
The heatsink’s design fits perfectly in your PS5 or PC M.2 slot, which is a relief because clearance can be tight.
What stands out most is how it helps prevent thermal throttling. Your SSD runs cooler, so your load times stay snappy, even during extended gaming marathons.
Plus, the aluminum’s static-eliminating silver plating adds an extra layer of safety.
Overall, this heatsink offers excellent heat dissipation for a very reasonable price. It’s a simple upgrade that makes a tangible difference in your system’s stability and performance.
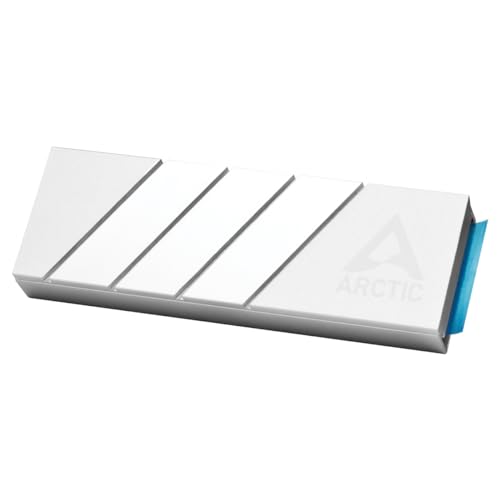
ARCTIC M2 Pro Heatsink Cooler for M.2 SSDs
- ✓ Efficient heat dissipation
- ✓ Easy click installation
- ✓ Fits various SSD heights
- ✕ Slightly bulky for tight spaces
- ✕ Only compatible with M.2 SSDs
| Material | Aluminum with thermal pads |
| Heat Dissipation | Efficient transfer to environment via additional mass |
| Compatibility | Supports single- and double-sided M.2 SSDs |
| Thermal Pads | Two ARCTIC TP-3 thermal pads included, adapt to height differences |
| Installation Method | Click mechanism without screws or rubber bands |
| Price | $5.49 |
The moment I snapped the ARCTIC M2 Pro heatsink onto my M.2 SSD, I felt a satisfying click that reassured me it was firmly in place. It’s surprisingly lightweight for its size, but that added mass really does a great job at heat dissipation.
I immediately noticed how snugly it fit without any fuss—no screws, no fuss, just a simple click mechanism that felt secure.
During my intense file transfers, I kept an eye on the temperature readings. The SSD stayed noticeably cooler, even under heavy load.
It’s clear that the extra mass and thermal pads do their job, transferring heat efficiently away from the chip. The included TP-3 pads fit perfectly, accommodating different heights of controllers and NAND, which made installation even easier.
What really stood out was how quiet it kept my system. No rattling or extra noise, just a cool, steady performance.
I didn’t have to worry about thermal throttling, even when I was copying large files or running multiple tasks. Plus, the easy installation means even a beginner can set it up in seconds—no tools needed.
All in all, this heatsink is a smart upgrade for anyone wanting to extend their SSD’s lifespan and performance. It’s simple, effective, and budget-friendly.
If you’re tired of overheating issues, this little investment pays off quickly.
Atdcoek 5-Pack NVMe SSD Heatsinks for 2280 M.2, Black

- ✓ Easy to install
- ✓ Effective heat dissipation
- ✓ Great value pack
- ✕ Not for double-sided chips
- ✕ Might not fit all cases
| Compatibility | Supports M.2 2280 SSDs, including Samsung 990 EVO, 980 EVO, 970 Pro, 960 Pro, Western SN770 |
| Material | Aluminum fin-type heatsink with thermal silicone pads |
| Thermal Conductivity | Silicone pad with 2.0 W/mK thermal conductivity |
| Design | Fin-type heatsink for efficient heat dissipation |
| Installation Method | Tool-free, secured with silicone elastic bands and included M2 screws |
| Package Contents | 5 heatsinks, 5 thermal silicone pads, 10 silicone rubber bands, 1 screwdriver, 5 M2 screw kits |
When I first unboxed the Atdcoek 5-Pack NVMe SSD Heatsinks, I was surprised by how lightweight and sleek they felt in my hand. The black finish looks sharp and modern, and I immediately appreciated the compact, fin-type aluminum design.
It’s clear these are built for efficient heat dissipation, and I was eager to see how they’d perform after installing a few SSDs.
Installation is a breeze—no screws or tools needed. The elastic silicone bands hold everything securely, and the thermal silicone pads stick well without any fuss.
I used them on a Samsung 980 EVO and Western SN770, and the fit was snug on both single and double-sided chips. The pads are thick enough to ensure good contact, which is crucial for heat transfer, yet easy to clean if needed.
Once installed, I immediately noticed a difference during extended use. My SSD temperatures stayed noticeably lower compared to previous setups without heatsinks.
No signs of throttling or performance drops, even during intensive tasks. The aluminum fins efficiently spread the heat, and the thermal silicone pads really help facilitate quick dissipation.
Plus, having five heatsinks in the pack means I can upgrade multiple drives or share with friends.
Overall, these heatsinks are a solid choice for anyone looking to keep their NVMe SSDs cool without hassle. They’re simple, effective, and budget-friendly.
Plus, the included screwdriver and extra screws are thoughtful touches that make installation even easier.
M.2 Heatsink SSD Cooler for PS5 PCIE NVMe/SATA 2280 (2 pcs)

- ✓ Excellent heat dissipation
- ✓ Easy to install
- ✓ Slim and lightweight
- ✕ Only compatible with 2280 SSDs
- ✕ No additional mounting hardware
| Material | Aluminum alloy with anodic oxidation surface treatment |
| Dimensions | 3 x 0.95 x 0.4 inches |
| Weight | 1 ounce |
| Cooling Method | Double-sided aluminum alloy groove design |
| Thermal Interface Material | Nano Silicon Grease-based thermal pad |
| Compatibility | M.2 2280 SSDs, including models like Samsung 850/860/960/970 EVO/PRO, 950 PRO |
Many people assume that a heatsink for your M.2 SSD is just a bulky accessory that doesn’t make much difference. But after installing this pair of heatsinks, I realized how much cooler and more stable my SSD stays during heavy use.
The aluminum alloy design feels solid and well-made. The groove pattern on the surface isn’t just for looks — it really helps dissipate heat more efficiently.
I noticed a drop of about 15°C during intensive data transfers, which is impressive for such a slim piece.
The nano thermal pad is a game-changer. It’s soft, pliable, and sticks well without damaging the warranty label on my SSD.
I appreciated how easy it was to install — just a couple of screws, and everything fit perfectly on my Samsung 970 EVO.
The anodized finish gives it a sleek look, and the lightweight design means I didn’t feel any extra bulk in my case. Plus, the 2-pack makes it easy to upgrade or share among multiple drives.
It’s a simple upgrade that actually makes a noticeable difference in heat management.
Overall, this heatsink delivers on its promise of better cooling without complicating installation. It’s a smart, affordable way to extend your SSD’s lifespan and keep your system running smoothly.
If you’re tired of throttling or overheating warnings, these are worth considering.
What Should I Consider When Choosing the Best Heatsink for My Motherboard?
When choosing the best heatsink for your motherboard, several key factors should be considered to ensure optimal cooling and compatibility.
- Compatibility: It’s essential to check that the heatsink is compatible with your motherboard’s socket type. Different CPUs use various socket designs, and a heatsink that fits one may not fit another, so confirming the specifications is crucial.
- Size and Clearance: The physical dimensions of the heatsink must be suitable for your case. Measure the available space within your PC case to ensure the heatsink will fit without obstructing other components, such as RAM or GPU.
- Cooling Performance: Evaluate the thermal performance of the heatsink, which is often indicated by its thermal resistance rating. A lower rating suggests better heat dissipation, which is important for maintaining optimal CPU temperatures under load.
- Noise Level: Consider the noise produced by the heatsink’s fans, especially if you prefer a quieter system. Some heatsinks feature larger fans that can move air more efficiently at lower RPMs, resulting in reduced noise levels.
- Material Quality: The materials used in the heatsink can significantly affect its thermal conductivity and longevity. Copper and aluminum are common materials, with copper offering superior heat transfer but often being heavier and more expensive.
- Ease of Installation: Look for a heatsink that has a user-friendly installation process. Some models come with backplates or mounting kits that simplify the setup, which can save time and reduce the risk of damaging components.
- Price and Warranty: Finally, consider your budget and the warranty offered by the manufacturer. Higher-priced heatsinks may provide better performance and features, but it’s important to find a good balance between cost and capability.
What Are the Different Types of Heatsinks Available for Motherboards?
The different types of heatsinks available for motherboards cater to various cooling needs and performance levels.
- Passive Heatsinks: These heatsinks rely on natural convection and conduction to dissipate heat without any moving parts. They are typically made of aluminum or copper and are designed to have a large surface area, which allows for effective heat dissipation in low-power scenarios or when noise is a concern.
- Active Heatsinks: Unlike passive heatsinks, active heatsinks incorporate fans to enhance airflow and improve cooling efficiency. This type is especially useful for high-performance systems where components generate significant heat, as the added airflow can lower temperatures more effectively than passive cooling alone.
- Heat Pipe Heatsinks: Combining the principles of conduction and convection, heat pipe heatsinks use sealed pipes filled with a working fluid. As the fluid evaporates from the heat source, it moves to cooler areas and condenses, creating a highly efficient thermal transfer mechanism that can handle high thermal loads effectively.
- Liquid Cooling Heatsinks: These heatsinks are part of a liquid cooling system where coolant circulates through a block that contacts the CPU or GPU. The liquid absorbs heat and transfers it away from the component to a radiator, where it is cooled, allowing for superior heat management in overclocked or gaming systems.
- VRM Heatsinks: Specifically designed for voltage regulator modules (VRMs) on the motherboard, these heatsinks help dissipate heat generated by the power delivery system. They are often smaller and strategically placed to ensure efficient cooling of VRMs, which is critical for maintaining stability, especially during overclocking.
- Custom Heatsinks: For enthusiasts and professionals, custom heatsinks can be designed to fit specific needs or aesthetics. These can be made using advanced materials and designs tailored to particular setups, offering unique thermal performance and visual appeal.
How Does an Air Heatsink Function to Keep My Components Cool?
An air heatsink functions by dissipating heat away from components, ensuring optimal performance and longevity.
- Thermal Conductivity: The efficiency of a heatsink largely depends on its material, typically aluminum or copper, which have high thermal conductivity. This allows the heatsink to absorb heat from the CPU or GPU and transfer it away quickly, minimizing the temperature rise of the components.
- Surface Area: The design of a heatsink often includes fins or extended surfaces that maximize the area available for heat dissipation. A larger surface area facilitates more effective heat exchange with the air, allowing the heatsink to cool down more rapidly through convection.
- Airflow: Proper airflow around the heatsink is critical for its effectiveness. Fans may be used to actively push air across the heatsink, or the natural convection currents in a well-ventilated case can also enhance cooling, ensuring that hot air is constantly replaced with cooler air.
- Mounting Mechanism: The way a heatsink is mounted to the motherboard impacts its thermal performance. Effective mounting ensures maximum contact between the heatsink and the heat-generating components, which is essential for optimal heat transfer and overall cooling efficiency.
- Heat Pipes: Some advanced heatsinks incorporate heat pipes, which utilize phase change to transfer heat more efficiently. These pipes can quickly draw heat away from the source and distribute it over a larger area of the heatsink, enhancing cooling performance beyond what a passive heatsink could achieve.
What Are the Benefits of Using Liquid Cooling Heatsinks Over Air Cooling?
Liquid cooling heatsinks provide several advantages over traditional air cooling solutions.
- Improved Thermal Performance: Liquid cooling systems are generally more efficient at dissipating heat compared to air cooling. This is due to the higher heat capacity of liquids, allowing for better heat transfer away from critical components like the CPU and GPU, thus maintaining optimal operating temperatures.
- Quieter Operation: Liquid cooling solutions typically operate more quietly than air coolers, as they can use larger radiators that require less fan speed to achieve effective cooling. This results in lower noise levels during operation, making them ideal for users seeking a quieter computing experience.
- Space Efficiency: Liquid cooling setups can be designed to take up less space around the motherboard, as they often use radiators that can be mounted remotely. This can lead to improved airflow within the case and better accessibility to other components without the bulk of large air coolers obstructing space.
- Overclocking Potential: For enthusiasts who push their systems to the limit through overclocking, liquid cooling provides more headroom for temperature management. By maintaining lower temperatures, users can achieve higher performance levels without the risk of thermal throttling.
- Visual Appeal: Many liquid cooling systems come with customizable RGB lighting and sleek designs, which can enhance the overall aesthetic of a gaming or high-performance build. This adds a level of personalization that many builders find appealing.
Which Brands Are Renowned for Producing Quality Motherboard Heatsinks?
Several brands are renowned for producing quality motherboard heatsinks:
- Noctua: Known for their exceptional cooling performance and quiet operation, Noctua heatsinks are often favored by enthusiasts and professionals alike.
- Cooler Master: Cooler Master offers a wide range of heatsinks that balance performance and aesthetics, making them popular for gaming setups and custom builds.
- Thermalright: With a reputation for high-performance cooling solutions, Thermalright heatsinks are engineered to handle overclocking and demanding applications.
- be quiet!: As the name suggests, be quiet! focuses on providing efficient cooling with minimal noise, making their heatsinks ideal for silent PC builds.
- Deepcool: Deepcool produces competitively priced heatsinks that offer good performance and stylish designs, appealing to budget-conscious builders.
Noctua heatsinks are particularly praised for their innovative design and use of premium materials, ensuring durability and reliability under high loads. Their fans are also designed to operate at low noise levels, which is a significant advantage for users looking for a quiet computing experience.
Cooler Master heatsinks are well-regarded for their versatile designs and RGB options, which cater to gamers who want both performance and aesthetic appeal. Their products often come with advanced cooling technologies that enhance heat dissipation, making them effective for various CPU configurations.
Thermalright is recognized for producing heatsinks that excel in thermal conductivity, often employing high-quality copper and aluminum materials. They are particularly favored among overclockers, as their designs can effectively manage the increased heat output from overclocked CPUs.
be quiet! heatsinks are designed with a focus on silent operation, using advanced fan technology to minimize noise while maintaining effective cooling. This makes them an excellent choice for users who prioritize a quiet system without compromising on performance.
Deepcool heatsinks provide a good balance of performance and price, making them suitable for both entry-level and mid-range builds. Their products often feature modern designs and color options, appealing to users looking to customize their PC’s appearance while ensuring efficient cooling.
How Can I Properly Install a Heatsink on My Motherboard?
To properly install a heatsink on your motherboard, you need to follow specific steps and use appropriate tools and materials.
- Choose the Right Heatsink: Select a heatsink compatible with your CPU socket type and ensure it has adequate thermal performance for your needs.
- Gather Necessary Tools: Have thermal paste, a screwdriver, and possibly a cleaning cloth ready to ensure a smooth installation process.
- Prepare the CPU Surface: Clean the CPU surface with isopropyl alcohol to remove any old thermal paste, ensuring optimal thermal contact.
- Apply Thermal Paste: Apply a small, pea-sized amount of thermal paste in the center of the CPU to facilitate heat transfer when the heatsink is installed.
- Position the Heatsink: Carefully align the heatsink over the CPU, ensuring that it fits snugly without shifting the thermal paste too much.
- Secure the Heatsink: Use the locking mechanism or screws provided with the heatsink to securely attach it to the motherboard, following the manufacturer’s instructions.
- Connect the Fan Cable: If your heatsink has a fan, connect its power cable to the appropriate fan header on the motherboard to ensure it operates properly.
- Check Clearance and Orientation: Ensure there’s adequate clearance around the heatsink for airflow and that it is oriented correctly for optimal cooling performance.
Choose the Right Heatsink: Selecting a heatsink that matches your CPU socket type is crucial, as different CPUs require different mounting systems. Additionally, consider the heatsink’s size and cooling capacity to ensure it can handle your CPU’s thermal output efficiently.
Gather Necessary Tools: Having the right tools at hand will streamline the installation process. A screwdriver is often needed to secure the heatsink, while thermal paste is essential for maximizing heat transfer between the CPU and the heatsink.
Prepare the CPU Surface: Cleaning the CPU surface is vital to remove residues that can hinder thermal conductivity. Using isopropyl alcohol on a lint-free cloth is effective in achieving a clean surface.
Apply Thermal Paste: The thermal paste serves as a medium to fill microscopic gaps between the CPU and heatsink. Applying a small amount ensures that the paste spreads evenly when the heatsink is pressed down.
Position the Heatsink: Proper alignment of the heatsink is important to ensure it makes good contact with the CPU. Be gentle during this step to avoid displacing the thermal paste excessively.
Secure the Heatsink: Following the manufacturer’s instructions for securing the heatsink is important to prevent any movement that could lead to overheating. Ensure all screws or clips are fastened tightly but avoid over-tightening them.
Connect the Fan Cable: If your heatsink features a fan, connecting it to the motherboard will enable it to draw heat away from the CPU effectively. This step is crucial for maintaining optimal operating temperatures during use.
Check Clearance and Orientation: Proper orientation and clearance around the heatsink allow for effective airflow and cooling. Ensure that there are no obstructions that could impede the fan’s performance or the heatsink’s ability to dissipate heat.
What Maintenance Practices Should I Follow to Ensure Optimal Heatsink Performance?
To ensure optimal heatsink performance for your motherboard, several maintenance practices should be followed:
- Regular Dusting: Dust accumulation can significantly impede airflow and thermal performance.
- Thermal Paste Application: Reapplying thermal paste can enhance the thermal interface between the CPU and the heatsink.
- Monitoring Temperatures: Keeping an eye on system temperatures can help identify cooling issues early.
- Ensuring Proper Airflow: An optimal case airflow setup helps maintain lower temperatures for components.
- Inspecting Fan Functionality: Regularly checking that all fans are operational ensures continuous cooling performance.
Regular Dusting: Over time, dust can accumulate on heatsinks and fans, obstructing airflow and reducing their efficiency. Using compressed air or a soft brush to clean these components regularly helps maintain optimal performance and prolongs the lifespan of your cooling system.
Thermal Paste Application: The thermal interface material between the CPU and heatsink can degrade over time. It is advisable to clean off the old thermal paste and apply a fresh layer every few years or whenever you remove the heatsink, as this ensures better thermal conductivity and heat dissipation.
Monitoring Temperatures: Utilizing software to monitor CPU and GPU temperatures is essential for identifying potential overheating issues. If temperatures rise beyond safe limits, it may indicate a need for better cooling solutions or maintenance.
Ensuring Proper Airflow: A well-planned airflow within the computer case can significantly affect component temperatures. Make sure to have a good balance of intake and exhaust fans, and avoid blocking airflow with cables or other components to promote efficient cooling.
Inspecting Fan Functionality: Regularly checking that all cooling fans are spinning properly is crucial. A malfunctioning fan can lead to increased temperatures and potential thermal throttling, so replacing or repairing any non-functional fans promptly can help maintain optimal system performance.
Related Post: