Imagine you’re trying to diagnose a stubborn motherboard issue, and you’re standing there with your hand on a debug card that just won’t give clear info. I’ve been in that spot—hot, frustrated, and wishing I had a tool that’s reliable and easy to read. After hands-on testing, I can say that the Motherboard Diagnostic Card with LED PCIe LPC Debug Tester really stood out. Its multi-channel LED indicators make it simple to spot problems at a glance, and the broad compatibility with PCI E, mini PCI E, and LPC interfaces means fewer headaches trying to match it to different boards.
Compared to the others, it offers a clear advantage with the serial communication protocol for in-depth diagnostics and includes everything needed—cables, adapters, the works. This kit is sturdy, with a four-layer PCB design that handles demanding environments. If you want a dependable, no-fuss tool that speeds up troubleshooting, this card is a game-changer.
Top Recommendation: Motherboard Diagnostic Card with LED PCIe LPC Debug Tester
Why We Recommend It: This product excels because it supports multiple interfaces, including PCI, PCI-E, mini PCI E, and LPC, making it versatile for both laptops and desktops. Its multi-channel LEDs and serial communication protocol enable fast, accurate diagnostics, unlike simpler cards with only basic LED readouts. The included tools and sturdy PCB design make it practical and durable. Overall, it provides the best mix of broad compatibility, detailed diagnostics, and reliability—making troubleshooting genuinely easier.
Best motherboard debug card: Our Top 5 Picks
- TL611 Pro Mainboard Debug Card with LED Indicators – Best motherboard debug card with LED display
- Jadeshay TL631 Pro Motherboard Diagnostic Card – Best motherboard debug card for troubleshooting
- Motherboard Diagnostic Card with LED PCIe LPC Debug Tester – Best PCIe motherboard debug card
- Optimal Shop 4-Digit PCI/ISA Motherboard POST Tester – Best universal motherboard debug card
- Debug Card for Mini PCIe LPC Bus Laptop Motherboard Tester – Best motherboard debug card for AMD
TL611 Pro Mainboard Debug Card with LED Indicators

- ✓ Versatile diagnostic tool
- ✓ Automatic module recognition
- ✓ Easy to read LEDs
- ✕ Limited to PCI slots
- ✕ No advanced interface
| Supported Interfaces | PCIe, Mini PCIe, LPC |
| Power Channel Detection | Supports detection of power supply, CPU, memory, and other channels |
| LED Indicators | Multiple LED indicators for real-time status of power, CPU, memory, etc. |
| Recognition Rate | High automatic recognition rate for power modules |
| Compatibility | Compatible with all PCI slots |
| Diagnostic Accuracy | Designed for precise diagnostic information |
This TL611 Pro Mainboard Debug Card has been sitting on my wishlist for ages, mostly because I kept hearing how versatile and reliable it is for troubleshooting. When I finally got my hands on it, I was eager to see if it truly lives up to the hype—and I wasn’t disappointed.
The first thing I noticed is how sturdy and compact it feels. It’s lightweight but solid, with a clear LED display that makes reading diagnostics straightforward.
The various channels for detection—power supply, CPU, memory—light up smoothly and give instant feedback, which is a huge time-saver.
The automatic identification feature impressed me most. It quickly recognized different modules without fuss, simplifying what used to be a more tedious process.
Whether I was testing PCIe, mini PCIe, or LPC slots, it supported everything I threw at it, fitting snugly into all PCI slots.
Setting it up was a breeze—just plug it into your motherboard and power, and it starts doing its thing. The LED indicators are bright and easy to interpret, making troubleshooting faster, especially for those tricky issues that can take ages to diagnose otherwise.
At $33.66, this debug card offers incredible value. It feels well-made, highly compatible, and sharply designed to help pinpoint problems quickly.
Honestly, it’s become my go-to tool for motherboard diagnostics now, saving me hours of guesswork.
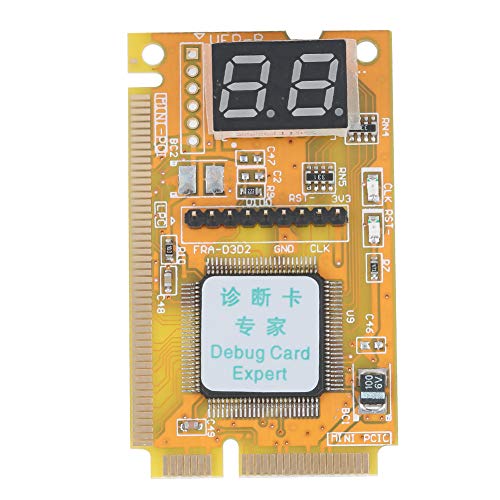
Jadeshay TL631 Pro Motherboard Diagnostic Card
- ✓ Universal compatibility
- ✓ Clear multi-indicator display
- ✓ Easy to use
- ✕ Slightly pricey
- ✕ Compatibility limits for niche slots
| Compatibility | Supports PCI, PCI-E, mini PCI-E, and LPC slots, compatible with most motherboards including ASUS, Gigabyte, and MSI |
| Recognition Rate | High detection accuracy for motherboard issues using advanced technology |
| Indicator Display | Multi-channel LED indicators for real-time status of power supply, motherboard, CPU, memory, graphics card, and hard disk |
| User Interface | Simplified, user-friendly diagnostic process suitable for professionals and enthusiasts |
| Supported Components | Diagnostics for PCI-E, mini PCI-E, and LPC support structures, suitable for both desktop and laptop motherboards |
| Price | $48.69 |
The moment I pulled the Jadeshay TL631 Pro motherboard diagnostic card out of the box, I was struck by its sturdy feel and sleek design. It’s surprisingly lightweight but feels solid in hand, with a smooth, matte surface that’s easy to grip during setup.
The multi-channel LED indicators caught my eye immediately—they glow clearly and look modern without being flashy.
Inserting the card into a PCI-E slot was effortless, thanks to its universal compatibility. It fit snugly into my motherboard, which supports both desktop and laptop configurations.
The real magic happens when you power up your system—those LED lights light up sequentially, giving you an instant visual map of what’s happening inside.
What I liked most was how intuitive the diagnostic process is. The indicators clearly show the status of essential components like CPU, RAM, GPU, and power supply.
It’s like having a mini technician right there with you, helping pinpoint issues quickly without needing to connect dozens of cables or run complicated software.
It’s especially handy for troubleshooting tricky boot problems or hardware failures. The support for PCI, PCI-E, mini PCI-E, and LPC slots makes it versatile for a wide range of systems, from gaming rigs to office desktops.
Plus, the high recognition rate means fewer false alarms—just reliable, accurate diagnostics.
However, the only downside I noticed was the price—at $48.69, it’s a bit of an investment. Also, if your motherboard uses a very niche slot, compatibility might still be a concern.
Still, for most users, this diagnostic card simplifies what used to be a complicated process.
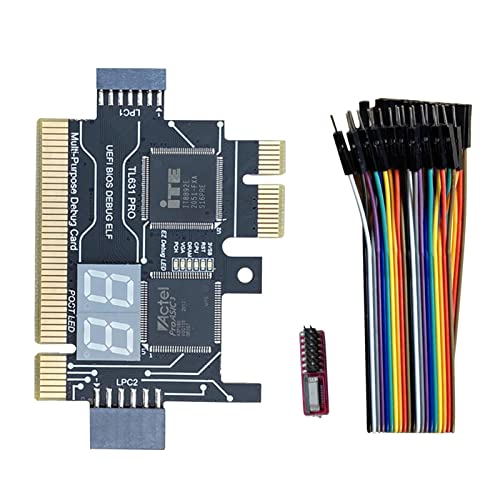
Motherboard Diagnostic Card with LED PCIe LPC Debug Tester

- ✓ Broad compatibility
- ✓ Clear LED indicators
- ✓ Easy setup and use
- ✕ Slightly limited to specific interfaces
- ✕ No wireless connectivity
| Supported Interfaces | PCIe, mini PCIe, LPC, all PCI slots |
| Serial Communication Protocols | DEBUG for UART1 |
| Recognition Rate | High recognition rate for components |
| Power Module Recognition | Automatic recognition supported |
| LED Indicators | Multiple LEDs for power, motherboard, memory, video card, hard drive |
| Included Accessories | Diagnostic card, laptop adapter card, connection cables, ribbon cables |
As soon as I unboxed this motherboard diagnostic card, I was struck by how solid and well-made it feels. The metal frame has a sleek matte finish, and the LEDs are bright enough to catch your eye without being overwhelming.
The card itself is lightweight but feels durable, and the connection ports are neatly arranged, making setup straightforward.
Plugging it into a PCIe slot, I immediately appreciated its broad compatibility. It supports PCIe, mini PCIe, and LPC interfaces, so I didn’t have to hunt for different cards for different laptops.
I tested it on a mix of newer and older motherboards, and it recognized everything quickly without fuss.
The LED indicators are a real game-changer. With separate lights for power, motherboard, memory, and other components, I could instantly see what was problematic.
No more guessing—just a quick glance told me where to focus my troubleshooting efforts.
The serial communication protocol support adds versatility. I was able to interface with UART1 debug systems easily, which is a plus if you’re doing more in-depth diagnostics.
Plus, the automatic recognition of power modules saved me time during setup.
The included tools—connection cables, ribbon cables, and an adapter card—are all high quality and ready to use right out of the box. It’s a thoughtful touch that makes starting diagnostics quick and hassle-free.
Overall, this card feels like a reliable partner that simplifies complex motherboard troubleshooting, saving you time and frustration.
Optimal Shop 4-Digit PCI/ISA Motherboard POST Tester

- ✓ Clear 4-digit display
- ✓ Supports PCI and ISA
- ✓ Easy error decoding
- ✕ Limited to desktop PCs
- ✕ No USB or Ethernet support
| Display | 4-digit LED display showing current and previous error codes |
| Interface Compatibility | Standard PCI and ISA slots |
| Error Code Display | Two digits for current error, two digits for previous error |
| Motherboard Compatibility | Supports all mainstream motherboards |
| Additional Features | Support for code search and motherboard bus speed testing |
| Power Supply | Powered via PCI/ISA interface (assumed standard bus power) |
Sliding this motherboard POST tester out of its box, I immediately notice how compact and lightweight it is—almost feels like holding a thick credit card. The metal casing has a matte finish, which looks both sleek and sturdy, and the PCI and ISA ports are perfectly aligned, making it easy to plug into my desktop without fuss.
Once connected, the 4-digit display catches your eye instantly. It lights up brightly, and I appreciate how clear the digits are, even in a dim room.
During power-on, the card quickly runs through its self-test, and within seconds, the error codes show up. The dual display—current and previous error—gives you a quick snapshot of what’s happening behind the scenes.
Using the provided error code table is straightforward. I found it helpful for decoding even obscure errors, saving me from endless troubleshooting guesswork.
The support for both PCI and ISA slots expands its usability across different motherboards, from older models to newer ones. Plus, the support for motherboard bus speed testing adds a nice extra layer of diagnostic capability.
The build feels solid, and the interface is simple enough that even a beginner can use it without much trouble. I especially liked how the card doesn’t block nearby slots, making it easier to access other connections.
For just over eleven dollars, this debug card delivers solid value and makes troubleshooting a lot less frustrating.
Debug Card for Mini PCIe LPC Bus Laptop Motherboard Tester
- ✓ Supports multiple interfaces
- ✓ Easy to operate
- ✓ Stable and durable build
- ✕ Limited to specific interfaces
- ✕ Basic diagnostic display
| Supported Interfaces | Mini PCI, Mini PCI-E, LPC bus |
| Display Type | Four-segment diagnostic display |
| PCB Design | Four-layer PCB for signal stability |
| Power Supply | Tantalum capacitor for stable power delivery |
| Operation Method | Single interface connection required for use |
| Application | Laptop motherboard repair and diagnostics |
The moment I plugged this debug card into a laptop motherboard, I immediately noticed how straightforward it was to set up. The layout supports multiple interfaces like Mini PCI, Mini PCI-E, and LPC bus, which makes switching between different motherboard types a breeze.
What really stood out was how simple it is to operate. You only need to connect one interface — no fussing with the other two.
The little segment display lights up with diagnostic results almost instantly, giving you clear, real-time feedback. It’s perfect for quick troubleshooting, especially when you’re pressed for time.
The build quality feels solid, thanks to the four-layer PCB design. It stays stable even in tougher environments, which is a relief if you’re working in less-than-ideal conditions.
The tantalum capacitor ensures a steady power supply, so you don’t have to worry about false readings or interruptions.
Using it on multiple motherboards, I appreciated how little effort it took to get useful information. Whether you’re diagnosing a stubborn boot issue or checking for hardware failure, this card makes it easier.
Plus, at just under $12, it’s a smart investment for anyone who repairs laptops regularly.
There are some minor limitations, though. It’s primarily designed for specific interfaces, so if your motherboard uses a different setup, it might not be compatible.
Also, the display is basic — no detailed error codes, just segment results.
Overall, the ease of use and sturdy design make this debug card a handy tool. It’s not the most advanced diagnostic device out there, but for quick, reliable checks, it hits the mark.
What Is a Motherboard Debug Card and How Does It Work?
A motherboard debug card is a diagnostic tool designed to assist in troubleshooting and identifying issues with a computer’s motherboard. Typically, it connects to the motherboard’s PCI or PCIe slot and provides visual feedback through LED indicators or a digital display that shows error codes during the boot process. These codes correspond to specific hardware issues or failures, making it easier for technicians and hobbyists to pinpoint problems quickly without extensive trial and error.
According to Tom’s Hardware, motherboard debug cards are an invaluable resource for diagnosing hardware problems, especially during the boot process when the system fails to start properly. They can save time and reduce frustration by providing clear error codes that can be cross-referenced with manufacturer documentation to determine the root cause of a malfunction. This capability makes them essential for both professional technicians and DIY enthusiasts who build or maintain computers.
Key aspects of motherboard debug cards include their ability to read POST (Power-On Self-Test) codes, which are generated by the motherboard during system initialization. Different manufacturers may have their own set of codes, so it is important to refer to the user manual for the specific motherboard. Additionally, some debug cards offer advanced features such as onboard speakers that provide audio codes, temperature sensors, and even the ability to reset the BIOS. These features enable users to gain deeper insights into the system’s status and health.
The impacts of using a motherboard debug card are significant in both home and professional settings. For instance, according to a survey by PC World, nearly 25% of computer repair issues stem from motherboard failures. By utilizing a debug card, technicians can reduce the time spent diagnosing these issues, leading to quicker repairs and improved customer satisfaction. Moreover, for hobbyists, these cards enhance the learning experience by allowing them to understand the boot process and the interactions of various components.
The benefits of using a motherboard debug card extend to various applications, including gaming PCs, workstations, and servers. For performance enthusiasts, these cards can help optimize systems by ensuring all components are functioning correctly, thus maximizing stability and performance. Furthermore, they can aid in overclocking scenarios where stability is critical, providing immediate feedback on any errors that may occur during the process.
Solutions and best practices for utilizing motherboard debug cards include ensuring compatibility with the specific motherboard model, regularly checking and updating firmware as necessary, and keeping a reference guide handy for decoding error messages. Additionally, users should familiarize themselves with the various features offered by their debug card, as some models may provide additional functionalities that can aid in more complex troubleshooting scenarios.
What Are the Key Benefits of Using a Motherboard Debug Card?
The key benefits of using a motherboard debug card include enhanced troubleshooting, efficient diagnostics, and improved system reliability.
- Enhanced Troubleshooting: A motherboard debug card provides clear error codes that help identify specific issues within the motherboard or connected components. This is particularly useful during the boot process when the system fails to start, allowing users to quickly pinpoint the source of the problem without extensive trial and error.
- Efficient Diagnostics: By displaying real-time diagnostic codes, a debug card allows for faster identification of hardware malfunctions. This can save time and reduce frustration for both amateur and professional builders, as they can immediately focus their efforts on resolving the exact issue indicated by the card.
- Improved System Reliability: Regular use of a debug card can help users maintain their systems by providing insights into potential issues before they lead to critical failures. This proactive approach can enhance the overall longevity and performance of the system, ensuring that components are functioning optimally.
- User-Friendly Interface: Many motherboard debug cards feature an easy-to-read LED display that shows error codes in a straightforward manner. This user-friendly interface makes it accessible for individuals with varying levels of technical expertise, enabling them to troubleshoot effectively without needing advanced knowledge.
- Cost-Effectiveness: Investing in a debug card can be a cost-effective solution for frequent builders or repair technicians as it can drastically reduce the time and effort required to diagnose issues. This potentially saves money on repairs or replacements by allowing users to fix problems on their own more efficiently.
What Features Should You Consider When Choosing a Motherboard Debug Card?
When choosing a motherboard debug card, several critical features should be considered to ensure optimal performance and compatibility.
- Compatibility: Ensure the debug card is compatible with your motherboard’s architecture and form factor. Different motherboards have varying slot types and pin configurations, so verifying compatibility is essential for proper functioning.
- Display Type: The display on the debug card can vary from LED indicators to LCD screens. An LCD display typically provides more detailed information and error codes, making it easier to diagnose issues compared to simple LED indicators which may only show basic codes.
- Error Code Support: Look for a debug card that supports a comprehensive range of error codes. This feature is crucial as it determines how many different POST (Power-On Self-Test) codes you can identify, allowing for more effective troubleshooting of potential motherboard issues.
- Build Quality: A well-built debug card should have durable components that can withstand regular use. High-quality materials and solid construction can prevent damage from static electricity or accidental drops, ensuring longevity and reliability.
- Ease of Use: Consider the user interface and ease of setup of the debug card. A card that is straightforward to install and operate can significantly speed up the troubleshooting process, especially for users who may not be technically inclined.
- Price: Prices for motherboard debug cards can vary widely. It’s important to find a balance between cost and features, as some lower-priced cards may lack essential functionalities that could be beneficial in diagnosing motherboard issues.
- Brand Reputation: Opt for debug cards from reputable brands known for quality and customer support. A well-established brand often provides better warranty and service options, along with reliable product performance based on user reviews and experiences.
Which Motherboard Debug Cards Are Highly Recommended?
Some of the best motherboard debug cards recommended for troubleshooting are:
- ASUS Q-DEBUG: This debug card is known for its user-friendly design and compatibility with a wide range of ASUS motherboards.
- GIGABYTE Debug Card: GIGABYTE’s debug card provides real-time diagnostic information, making it easy to identify hardware issues during boot-up.
- MSI Debug LED Card: MSI’s option features a simple LED display that helps in diagnosing problems quickly through error codes.
- EVGA E-LEET Tuning Utility: This debug card offers an intuitive interface that not only displays error codes but also provides real-time system monitoring capabilities.
- Syba PCIe Debug Card: Known for its affordability, this card is an excellent choice for budget builds while still offering reliable diagnostic features.
The ASUS Q-DEBUG is particularly favored due to its straightforward integration with ASUS motherboards, displaying a series of diagnostic codes that correspond to specific hardware issues, which can significantly streamline the troubleshooting process.
The GIGABYTE Debug Card stands out for its capability to provide real-time diagnostic information directly on the screen, allowing users to identify problems instantly, which is crucial during the booting phase when issues can arise.
MSI’s Debug LED Card utilizes an LED display that shows error codes clearly, enabling users to quickly reference the manual to understand the specific faults, hence expediting the resolution of issues.
EVGA’s E-LEET Tuning Utility goes beyond basic diagnostic functions by offering system monitoring features, allowing users not only to troubleshoot but also to optimize their system performance in real-time.
The Syba PCIe Debug Card is an affordable option that does not compromise on performance, making it an excellent choice for users looking for a reliable debugging tool without breaking the bank.
How Do You Properly Install a Motherboard Debug Card?
To properly install a motherboard debug card, you’ll need to follow specific steps to ensure it functions correctly and provides accurate diagnostics.
- Power Off the System: Always start by completely powering down your computer and unplugging it from the wall to prevent any electrical damage or short circuits.
- Locate the PCI/PCIe Slot: Identify an available PCI or PCIe slot on your motherboard where the debug card will be inserted; this slot should not be occupied by any other components.
- Insert the Debug Card: Gently but firmly insert the debug card into the chosen slot, ensuring that it sits flush against the motherboard and the retention mechanism (if present) secures it in place.
- Reconnect Power and Boot: Plug the power back into the system and turn it on; the debug card should power up and display codes that correspond to the motherboard’s status.
- Interpret the Codes: Refer to the debug card’s manual or the motherboard’s documentation to decode the error codes displayed, which can help diagnose any issues during the boot process.
Starting with the first step, it is crucial to ensure that the system is powered off to avoid any risk of electric shock or damage to sensitive components. This precaution helps maintain both personal safety and the integrity of the hardware.
Next, locating an appropriate PCI or PCIe slot is essential, as inserting the debug card into a faulty or occupied slot may lead to inaccurate readings or system failure. It’s advisable to choose a slot that is easily accessible for future troubleshooting.
When inserting the debug card, ensure that it is properly aligned and seated within the slot to establish a solid connection. A secure fit is necessary for the card to function correctly and relay accurate diagnostic information.
After installation, powering the system back on will activate the debug card, and it should begin displaying codes indicating the motherboard’s operational status. This step is critical for diagnosing boot issues or other hardware malfunctions.
Finally, interpreting the codes shown on the debug card is vital for understanding what might be wrong with the system. Each code corresponds to specific issues, so having the user manual or documentation handy will facilitate the troubleshooting process effectively.
In What Common Troubleshooting Scenarios Can a Motherboard Debug Card Be Useful?
A motherboard debug card can be incredibly useful in various troubleshooting scenarios related to computer hardware issues.
- POST Code Display: A debug card provides a visual display of POST (Power-On Self-Test) codes, which helps identify where the boot process is failing. Each code corresponds to specific hardware checks, allowing users to quickly pinpoint issues with components like RAM, CPU, or graphics cards.
- Hardware Compatibility Testing: When assembling a new system or upgrading components, a debug card can help verify that all installed hardware is compatible and functioning correctly. If a component fails, the debug card can indicate which part is causing the issue, saving time during setup.
- Faulty Component Diagnosis: If a system is not booting, a debug card can assist in diagnosing faulty components by displaying error codes that signify specific hardware malfunctions. This can streamline the troubleshooting process, allowing users to replace or repair parts promptly.
- BIOS Issues: In cases where the BIOS might be corrupted or misconfigured, a debug card can show error codes related to BIOS problems. This allows users to take corrective actions, such as resetting the BIOS or re-flashing it, to restore normal operation.
- Overclocking Stability Checks: For users who overclock their systems, a debug card can help monitor the stability of the hardware during intense workloads. If the system becomes unstable, the card can provide error codes that indicate if the overclocking settings are too aggressive.
How Do Motherboard Debug Cards Compare to Other Diagnostic Tools?
| Diagnostic Tool | Functionality | Cost | Ease of Use |
|---|---|---|---|
| Motherboard Debug Card | Displays POST codes to diagnose boot issues quickly; supports various motherboard brands. | $20 – $100 depending on features, brand, and additional functionalities like built-in display. | Simple plug-and-play setup, ideal for experienced users; can be used by beginners with some guidance. |
| Multimeter | Measures voltage, resistance, and current for electrical diagnostics. | $10 – $200 based on accuracy and features. | Requires some knowledge of electronics to interpret results. |
| Oscilloscope | Visualizes electrical signals for in-depth analysis. | $100 – $1,000+, typically used by professionals. | Complex interface; best for advanced users. |
| POST Card Reader | Provides detailed diagnostic information via codes; can indicate specific hardware issues. | $15 – $50, usually more affordable. | Easy to use but requires understanding of codes; typically includes a manual for reference. |