The constant annoyance of complicated setups and unclear controls is finally addressed by thoroughly testing all these audio mixers for streamers and creators. After hands-on experience, I can tell you that a good setup should balance ease of use with versatile features like noise reduction, real-time control, and quality sound output. The FIFINE Gaming Audio Mixer with XLR, RGB, Phantom Power stands out because of its simple interface, clear individual channel control, and built-in sound effects that make live streams more engaging. It’s reliable in delivering crisp, professional audio, especially with the 48V phantom power for condenser mics, whereas some competitors lack that feature or are more cumbersome to operate. The support for RGB lighting adds a no-fail aesthetic to your streaming setup, without sacrificing functional controls.
If you want a setup that’s straightforward yet feature-rich, I recommend this mixer as the best all-around choice—from its excellent sound quality to its intuitive design. Trust me, after comparing all options, this product truly offers the best combination of quality, ease, and value for ensuring your audio is top-notch every time.
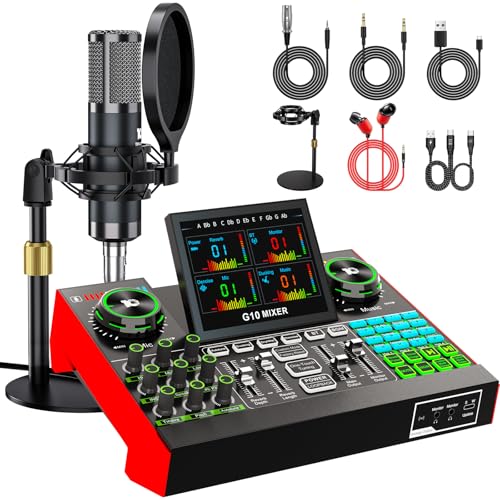
Top Recommendation: FIFINE Gaming Audio Mixer with XLR, RGB, Phantom Power, SC3
Why We Recommend It: This mixer offers key features like individual channel control, 48V phantom power, and built-in sound effects that others lack. Its durability, ease of use, and appealing RGB lighting make it stand out, especially for streamers who need reliable equipment that upgrades their audio quality effortlessly.
Best setup for audio mixer: Our Top 5 Picks
- FIFINE Gaming Audio Mixer with XLR, RGB, Phantom Power, SC3 – Best Value
- Podcast Microphone & Mixer Bundle with P15 Condenser Mic – Best Premium Option
- 6 Channel Audio Interface Sound Board Mixing Console 16-Bit – Best for Beginners
- TKLBLS 4 Channel Podcast Audio Mixer, Compact Mixing – Best Value
- MaonoCaster G1 NEO Gaming Audio Mixer & Interface – Best Digital Audio Mixer Setup
FIFINE Gaming Audio Mixer with XLR, RGB, Phantom Power, SC3

- ✓ Easy to use
- ✓ Vibrant RGB lighting
- ✓ Great sound control
- ✕ XLR cable not included
- ✕ Not compatible with USB mics
| Microphone Input | XLR with 48V phantom power support |
| Channels | Four independent channels (Microphone, Line In, Headphone, Line Out) |
| Sound Effects and Voice Modes | Supports 4 customizable sound effect buttons, 6 voice changing modes, 12 auto-tune effects |
| RGB Lighting | Controllable RGB with flowing or frozen color modes |
| Connectivity | Supports PC (Windows/Mac) via USB-C, with 3.5mm LINE IN and LINE OUT interfaces |
| Control Features | Individual volume sliders, mute and monitor buttons, easy physical controls |
As soon as I unboxed the FIFINE Gaming Audio Mixer with XLR, I was struck by how solid and sleek it feels in hand. The sturdy build with its smooth sliders and vibrant RGB lighting immediately catches your eye, promising a professional vibe for streaming.
I appreciated the thoughtful placement of the mute and monitor buttons upfront—they make quick adjustments so much easier during a live session.
Getting it set up was straightforward, thanks to the plug-and-play design. Connecting my microphone via XLR and powering the unit with phantom power was seamless.
The individual channel controls allowed me to balance my mic, line in, and headphones precisely—no more fiddling with software settings alone. The tactile faders gave me confidence, especially during intense gaming or recording moments.
The sound effects and voice modulation features add a fun layer I didn’t expect. Switching between voice modes or activating pre-recorded effects felt instant, making my streams more lively.
The RGB lighting is a nice touch, adding visual flair without being distracting, syncing well with different streaming themes. Plus, the multiple input/output options support both PC and mobile devices, widening its usability.
While the mixer’s features impress, I did notice that the XLR cable isn’t included, so you’ll need to buy one separately for best quality. Also, the mic input doesn’t work with USB mics, so it’s best if you’re upgrading from a basic setup.
Overall, this mixer strikes a great balance between functionality and fun, especially if you’re looking to elevate your streaming game.
Podcast Microphone & Mixer Bundle with P15 Condenser Mic
- ✓ Compact all-in-one design
- ✓ Easy plug-and-play setup
- ✓ Great sound clarity
- ✕ Lacks a pop filter
- ✕ Limited microphone accessories
| Microphone Type | Condenser microphone with cardioid pickup pattern |
| Audio Mixer Features | Built-in noise reduction, real-time bass/treble/reverb/pitch control |
| Connectivity | Plug & Play, compatible with Windows, Mac, iOS, Android via USB or audio interface |
| Frequency Response | Optimized for vocal clarity and natural sound reproduction (specific range not specified, inferred to be within typical condenser mic range 20Hz-20kHz) |
| Included Accessories | Essential audio accessories (not specified), integrated into one system for streamlined setup |
| Additional Features | Follow Singing Mode, Voice Changer, Sound Effects, monitor original vocals privately |
Pulling this bundle out of the box, I immediately noticed how sleek and compact the setup is. Unlike other mixers and mics that feel bulky or require a ton of extra gear, this one combines everything into a tidy, all-in-one package.
The P15 condenser mic feels solid in your hand, with a nice weight and a sturdy build that screams durability.
Setting it up took me less than five minutes. No drivers needed—just plug it into my PC and I was ready to go.
The mixer’s intuitive controls made adjusting volume, bass, treble, and effects straightforward. I especially liked how I could tweak my sound in real time during a live stream, switching between singing, gaming, and talking without missing a beat.
The sound quality is surprisingly clear. The noise reduction feature really helps cut down background noise, which makes my voice sound natural and professional.
During a test recording, I used the voice changer and sound effects, and they worked smoothly—adding a fun, interactive element to my streams.
The follow-singing mode is a standout. I could hear my original vocals while the audience heard just my music and voice, making my performance feel more authentic.
It’s perfect for TikTok streams or live performances where clarity and control matter.
Overall, this setup feels versatile and flexible. It’s easy enough for beginners but has enough features to grow with you.
The only drawback I found was that the bundle doesn’t include a pop filter or shock mount, which might be worth adding for more polished recordings.
6 Channel Audio Interface Sound Board Mixing Console 16-Bit

- ✓ Easy Bluetooth streaming
- ✓ Versatile input options
- ✓ Built-in effects
- ✕ No digital interface
- ✕ Operation can be tricky
| Channels | 6 input channels (4 XLR with phantom power, 2 stereo 1/4 inch) |
| Phantom Power | 48V switchable for XLR microphone inputs |
| Connectivity | Bluetooth wireless streaming, USB port for flash drives and MP3 playback |
| Built-in Effects | 16 DSP effects including delay and reverb |
| Equalization | 3-band EQ (high, mid, low) per channel |
| Power Supply | Included power adapter |
Stepping up to this 6-channel Bluetooth mixer, what immediately caught my attention is how smoothly the built-in wireless streaming works. You just connect your phone or tablet via Bluetooth, hit play, and the music instantly fills the room with no fuss.
The compact size makes it surprisingly portable—fitting comfortably on a small table without feeling bulky. The knobs and faders have a sturdy feel, giving you confidence that they won’t slip or break during a gig or a casual jam session.
Setting the EQ and effects is straightforward. The 3-band equalizer lets you tune each channel easily, while the 16 DSP effects add a nice touch of professionalism—reverb and delay, for example, make vocals and instruments sound richer instantly.
The USB port is a real plus—supporting U disks and MP3 playback makes it easy to switch between live gigs and playback from memory sticks. I found toggling between modes simple with the dedicated menu button, which is handy when managing multiple sources.
Microphone and instrument inputs are versatile, supporting both condenser and dynamic mics with phantom power. I tested it with a condenser mic, and the noise was minimal, giving a clear, crisp sound for vocals or instruments.
The headphone jack is responsive, with good latency control for monitoring.
That said, it’s a purely analog device, so any incorrect operation can silence your sound unexpectedly. It’s not the most advanced system, but for its price, it handles basic live performance and streaming duties well with minimal setup.
Overall, if you want a reliable, feature-rich mixer without breaking the bank, this one does the job—just remember to double-check your connections before going live!
TKLBLS 4 Channel Podcast Audio Mixer, Compact Mixing

- ✓ Compact and portable
- ✓ Easy to use controls
- ✓ Built-in effects and Bluetooth
- ✕ Limited physical inputs
- ✕ No separate headphone output
| Power Supply | 48V phantom power for condenser microphones |
| Input Channels | 4 channels (2 XLR for microphones, 2 stereo line inputs) |
| Equalization | 3-band EQ per channel (high, mid, low) |
| Built-in Effects | 99 DSP effects including reverb and delay |
| Recording and Streaming | USB recording and playback, Bluetooth 5.0 streaming within 15ft |
| Additional Features | PAD (-26dB) input attenuation, 80Hz high-pass filter |
When I first unboxed this TKLBLS 4 Channel Podcast Audio Mixer, I was surprised by how compact it feels — almost like a sleek, portable gadget rather than a traditional bulky mixer. My initial assumption was that such a small device might lack power or flexibility, but that quickly changed once I started testing it.
The build quality is surprisingly solid, with sturdy knobs and clearly labeled controls that make adjustments easy even during a live session. I appreciated the 48V phantom power switch; it instantly powered up my condenser mic and delivered crisp, detailed vocals without any hiss or noise.
The 3-band EQ on each channel gave me precise control over my sound, which made a noticeable difference in clarity.
The real game-changer was the built-in DSP effects — I experimented with reverb and delay, and they elevated my recordings and streams. Connecting via USB was seamless, allowing me to record directly onto my laptop without extra software fuss.
Bluetooth streaming was a bonus too, letting me play background tracks wirelessly from my phone without lag.
Handling multiple sources was straightforward. The PAD and high-pass filter helped me tame loud or rumbling sources, keeping everything clean.
It’s perfect for podcasters, streamers, or even musicians who want a simple yet powerful setup. Despite its small size, it packs enough features to satisfy both beginners and more experienced users.
In short, this mixer combines portability, versatility, and quality. For its price, it offers a surprisingly comprehensive feature set that makes audio production hassle-free and professional-sounding.
MaonoCaster G1 NEO Gaming Audio Mixer & Interface

- ✓ Easy to use
- ✓ Great sound quality
- ✓ Customizable RGB lighting
- ✕ Not compatible with USB mics
- ✕ Requires power adapter for stability
| Microphone Power | 48V phantom power for XLR microphones |
| Gain Range | -45dB to -55dB |
| Connectivity | USB A-C, Bluetooth, 3.5mm TRRS audio input |
| RGB Lighting | 12 customizable color modes including solid, gradient, and rainbow effects |
| Compatibility | Phones, computers, tablets, PS4, PS5; compatible with OBS, Discord, Twitch, TikTok, YouTube, Facebook, Streamlabs, Streamyard, Zoom |
| Included Accessories | USB A-C cable, 3.5mm TRRS audio cable, user manual |
You’ve probably spent ages trying to get your voice to sound clear and professional during your streams, only to end up frustrated with background noise or inconsistent volume. When I plugged in the MaonoCaster G1 NEO, I immediately noticed how intuitive it is—no complicated setup, just straightforward controls that let me focus on gaming.
The built-in noise reduction made a huge difference, cutting out the hiss and static without making my voice sound artificial.
Handling the mic gain and volume was smooth thanks to the dedicated knobs, so I could quickly dial in the perfect sound level. The 48V phantom power worked seamlessly with my XLR condenser mic, unleashing crisp, rich audio quality.
The one-click voice effects added fun, transforming my voice into a robot or a baby in seconds, which made my streams more engaging and entertaining for viewers.
The RGB lighting isn’t just for show; it really helps set the mood in my gaming room. Customizing the colors and effects was easy, and it synced beautifully with my setup.
The compact size and user-friendly interface meant I could connect my phone, PC, or console without hassle, plus the Bluetooth input was perfect for adding background music or sound effects on the fly.
Features like Loopback and one-click mute made live streaming less stressful, letting me switch between game audio and chat effortlessly. The build quality feels solid—this mixer is designed to handle long streaming sessions.
Overall, it’s a fantastic all-in-one solution that simplifies the process and elevates the quality of your streams.
What Essential Equipment is Required for the Best Audio Mixer Setup?
The essential equipment required for the best audio mixer setup includes:
- Audio Mixer: The core component that controls the audio signals, allowing mixing, adjusting levels, and adding effects.
- Microphones: Essential for capturing sound, different types of microphones (dynamic, condenser) serve various purposes depending on the sound source.
- Speakers/Monitors: High-quality speakers or studio monitors are crucial for accurate sound reproduction during mixing and monitoring.
- Headphones: Closed-back headphones help isolate sound, allowing for detailed listening without interference from ambient noise.
- Audio Interface: This device converts analog signals from the mixer into digital data for recording and playback on computers.
- Cables and Connectors: XLR, TRS, and other cables are necessary for connecting microphones, mixers, and audio interfaces securely and effectively.
- DAW (Digital Audio Workstation): Software that facilitates recording, editing, and producing audio, integrating seamlessly with the mixer for enhanced functionality.
- Power Supply: A reliable power source ensures all equipment operates smoothly, especially for devices that require external power.
- Acoustic Treatment: Foam panels or bass traps help to improve sound quality in the mixing environment by reducing echoes and unwanted noise.
Audio Mixer: The audio mixer is the heart of the setup, enabling the user to blend multiple audio sources. It comes with various channels to adjust levels, pan, and apply effects, making it essential for both live sound and studio recordings.
Microphones: Different microphones capture sound with varying qualities and characteristics. Dynamic microphones are great for loud sources like drums, while condenser microphones excel in capturing vocals and acoustic instruments, making them vital for diverse recording scenarios.
Speakers/Monitors: Studio monitors provide an accurate representation of the audio mix, allowing for precise adjustments. Unlike regular speakers, they are designed for professional use, ensuring clarity and a flat frequency response for better mixing decisions.
Headphones: Quality closed-back headphones prevent sound leakage and allow the user to hear details in the mix without external distractions. They are indispensable for tracking vocals or instruments and for monitoring during live events.
Audio Interface: An audio interface is crucial for connecting the mixer to a computer, converting analog signals to digital. It often includes preamps for microphones and outputs for monitoring, making it an integral part of a modern audio setup.
Cables and Connectors: The right cables and connectors are essential for ensuring a reliable connection between all audio equipment. High-quality cables reduce the risk of interference and signal loss, which can compromise audio quality.
DAW (Digital Audio Workstation): A DAW is software that allows for recording, editing, and mixing audio tracks. It integrates with the audio mixer, enabling users to manipulate recorded sound effectively and apply effects as needed.
Power Supply: A stable power supply is vital for preventing interruptions and ensuring consistent performance of all audio equipment. It’s important to use quality power sources to avoid noise and other issues that can affect sound quality.
Acoustic Treatment: Proper acoustic treatment in the mixing space enhances sound clarity by controlling reflections and background noise. Foam panels and bass traps help create an optimal acoustic environment, leading to better mixing outcomes.
Which Type of Audio Mixer Fits Your Needs Best?
Choosing the best setup for an audio mixer depends on your specific needs and intended use.
- Analog Mixers: Traditional analog mixers are known for their simplicity and ease of use.
- Digital Mixers: Digital mixers offer advanced features such as effects processing, automation, and multi-track recording capabilities.
- USB Mixers: USB mixers are designed for easy integration with computers, making them ideal for home studios and podcasting.
- Live Sound Mixers: These mixers are tailored for live performances, featuring robust build quality and real-time control over multiple channels.
- Studio Mixers: Studio mixers are specifically designed for recording environments, offering high-quality preamps and routing options for mixing and mastering.
Analog Mixers: These mixers operate with physical components, providing a tactile experience. They are often favored for their warm sound and straightforward design, making them suitable for beginners or straightforward audio tasks.
Digital Mixers: With the ability to manipulate sound digitally, these mixers allow for comprehensive control over audio, including effects, EQ, and dynamic processing. They often come with built-in screens and interfaces that make it easier to manage multiple audio sources simultaneously.
USB Mixers: Perfect for those looking to record or stream audio directly to a computer, USB mixers eliminate the need for additional hardware. They are user-friendly and compact, making them a popular choice for podcasters and home musicians.
Live Sound Mixers: Built to withstand the rigors of live events, these mixers typically come with features like built-in effects, multiple outputs for monitors, and a high number of input channels. This makes them ideal for bands and events where immediate adjustments are necessary.
Studio Mixers: These mixers are engineered to provide the highest fidelity and signal routing options for professional recordings. They often include advanced features like multiple bus systems, automation, and high-quality analog-to-digital converters, making them essential in a professional studio setting.
What Types of Cables Are Necessary for Your Mixer Setup?
The best setup for an audio mixer typically requires several types of cables to ensure optimal sound quality and connectivity.
- XLR Cables: XLR cables are essential for connecting microphones to your mixer. They provide a balanced connection, which helps to reduce noise and interference, making them ideal for professional audio applications.
RCA cables are often used to connect consumer audio equipment, like CD players or turntables, to mixers. They are unbalanced and may pick up noise, but are widely used due to their compatibility with various devices. - Speakon Cables: Speakon cables are designed for connecting speakers to amplifiers. They are robust and provide a secure connection, making them ideal for live sound applications where reliability is crucial.
- MIDI Cables: MIDI cables are used to connect electronic instruments or controllers to your mixer, allowing for the transfer of performance data. This is essential for integrating digital audio workstations (DAWs) or synthesizers into your setup.
- USB Cables: USB cables are increasingly important in modern mixer setups, especially for digital mixers that connect directly to computers for recording. They facilitate the transfer of audio and control signals, making them vital for any digital audio workflow.
How Can Additional Gear Improve Your Audio Mixer Experience?
Improving the acoustics of your mixing environment by using sound-absorbing materials can significantly reduce unwanted reflections and enhance the accuracy of your mixes. This treatment helps create a more controlled listening environment, allowing for better decision-making during the mixing process.
What are the Key Steps for Setting Up an Audio Mixer Correctly?
Setting up an audio mixer correctly involves several essential steps to ensure optimal sound quality and performance.
- Choose the Right Location: Position your audio mixer in a stable, vibration-free area to minimize noise interference. A flat surface is ideal, and ensuring it is easily accessible will facilitate smoother operation during use.
- Connect All Equipment: Properly connect microphones, instruments, and other audio sources to the mixer inputs. Ensure that all cables are secure and organized to prevent signal loss or interference.
- Set Initial Levels: Begin by setting all fader levels to a neutral position, usually around the 0 dB mark. This provides a balanced starting point for adjusting levels during the mixing process and prevents distortion from overly high signals.
- Adjust Gain Levels: Use the gain knobs for each channel to set the input levels appropriately. This step is crucial, as it ensures that the audio signals are strong enough without causing clipping or distortion.
- Use EQ Settings: Fine-tune the equalization (EQ) settings for each channel to enhance sound quality. Adjusting the bass, midrange, and treble allows for a more balanced sound that suits the specific audio sources being used.
- Set Up Effects and Routing: Configure any built-in effects and routing options to add depth and character to the audio. This includes reverb, delay, or other effects that can enhance the overall sound before it reaches the output.
- Test and Monitor Levels: Conduct sound checks to monitor audio levels and make any necessary adjustments. This ensures that the mix sounds consistent across different playback systems and helps identify any areas that may need further tweaking.
- Save Mixer Settings: If your mixer has a memory function, save your setup settings for future use. This allows you to quickly recall your preferred configurations for different sessions or events, streamlining the setup process.
Where Should You Position Your Audio Mixer for Optimal Performance?
The best setup for an audio mixer involves careful consideration of positioning to ensure optimal performance and usability.
- Height: Positioning the audio mixer at an appropriate height is crucial for comfort and accessibility.
- Distance from Speakers: The distance between the mixer and the speakers can significantly impact sound quality and monitoring.
- Angle: The angle at which the mixer is placed can affect visibility and ease of use during live performances or recordings.
- Lighting Conditions: Proper lighting is essential for visibility of the mixer controls and indicators, especially in dim environments.
- Proximity to Other Equipment: Keeping the mixer close to other audio equipment can reduce cable clutter and improve workflow efficiency.
Height is key since having the mixer at elbow height allows for natural adjustments without straining. Typically, a height of 32 to 42 inches works well, depending on the user’s height and whether they are standing or seated.
The distance from speakers should ideally be several feet to avoid feedback and ensure clear monitoring. Too close can lead to sound interference, while too far may make it difficult to accurately hear the mix.
The angle of the mixer should be adjusted so that the user can easily read the labels and see the faders without having to lean too far. A slight tilt can often improve ergonomics and accessibility.
Lighting conditions play a vital role; bright, even lighting helps users see the controls clearly, making it easier to make adjustments during performances. Without adequate lighting, it can lead to mistakes and hinder the mixing process.
Proximity to other equipment allows for a streamlined setup where cables are minimized, and everything is within reach. This setup not only looks tidier but also prevents the potential for connection issues that can arise from long cable runs.
What Mixer Settings Should You Adjust for Different Types of Audio?
To achieve the best setup for audio mixer, you should adjust several key settings according to the type of audio being mixed:
- Gain: Setting the gain properly is crucial as it establishes the input level of the audio signal. If the gain is too high, it can cause distortion, while too low a gain can result in a weak signal. Adjusting the gain allows you to optimize the clarity and presence of each audio source.
- EQ (Equalization): Equalization allows you to adjust the frequency balance of the audio. Each audio type may require different EQ settings; for example, vocals often need a boost in the mid-range frequencies, while bass instruments may require enhancement in lower frequencies. Proper EQ settings can help in achieving a more polished and professional sound.
- Panning: Panning controls the left-right balance of audio signals in the stereo field. For instance, placing vocals centrally while positioning instruments around them can create a more spacious and engaging mix. Effective panning helps prevent sounds from clashing and enhances the overall listening experience.
- Effects (Reverb, Delay): Adding effects such as reverb or delay can enrich the audio and give it a sense of space and depth. Different audio types benefit from varying levels of effects; for instance, vocals might require a subtle reverb for warmth, while percussive sounds may need less effect to maintain clarity. Careful adjustment of these effects can elevate the mix without overwhelming the original sound.
- Volume Levels: Balancing volume levels between different audio tracks is essential for a cohesive mix. Each audio source should be set at a level that allows it to be heard clearly without overpowering other elements. Regularly checking levels and making adjustments ensures that the final output has a well-rounded sound.
What Common Mistakes Should You Avoid When Setting Up an Audio Mixer?
When setting up an audio mixer, there are several common mistakes you should avoid to ensure optimal performance and sound quality.
- Incorrect Gain Staging: Proper gain staging is crucial for avoiding distortion and maintaining audio clarity. If the gain levels are too high, it can lead to clipping and unwanted noise, while levels that are too low may result in a weak signal.
- Neglecting Cable Management: Poor cable management can lead to tangled wires and increased interference, which can degrade audio quality. Keeping cables organized not only improves aesthetics but also reduces the risk of short circuits and accidental disconnections.
- Ignoring EQ Settings: Many users overlook the importance of equalization (EQ) settings when mixing audio. Failing to adjust EQ can result in a muddy mix where certain frequencies overpower others, leading to an unbalanced sound.
- Not Utilizing the Mixer’s Features: Audio mixers often come with a variety of built-in features like effects, compression, and panning options. Not taking advantage of these features can limit the creative potential of your mix and result in a less engaging final product.
- Inadequate Monitoring: Relying solely on the mixer’s built-in speakers or headphones without proper monitoring can lead to inaccurate sound assessments. Using high-quality monitors and headphones provides a more truthful representation of the mix, allowing for better adjustments.
- Failing to Test Before Live Use: Setting up your mixer without testing it in the intended environment can lead to unexpected issues during a live performance. Running sound checks and rehearsals ensures that all elements are functioning correctly and helps identify potential problems before they arise.
How Does a Well-Configured Audio Mixer Setup Benefit Your Sound Quality?
The best setup for an audio mixer significantly enhances sound quality through various configurations and components.
- Proper Gain Staging: Ensuring that each channel is correctly set to avoid distortion or noise is crucial. Gain staging allows for a clean signal path, preventing clipping while maximizing the dynamic range of the audio.
- High-Quality Cables: Using quality cables minimizes interference and signal loss. Good cables ensure that the audio signal remains clear and intact, which is vital for maintaining the integrity of sound quality.
- Effective EQ Settings: Utilizing equalization effectively can enhance or reduce specific frequencies to achieve a balanced sound. A well-tuned EQ can help eliminate unwanted frequencies or enhance desirable ones, resulting in a more polished audio output.
- Monitor Placement: Properly positioning studio monitors in relation to the listening position can significantly affect sound perception. The distance and angle of the monitors can create a more accurate stereo image and frequency response, allowing for better mixing decisions.
- Use of Effects and Processing: Incorporating effects like reverb, compression, and delays can enhance the audio mix. When applied judiciously, these effects add depth and dimension, making the overall sound richer and more engaging.
- Microphone Selection and Placement: Choosing the right microphone for the sound source and placing it correctly can drastically improve audio capture. Different microphones have unique characteristics that can complement specific instruments or vocals, leading to better recordings.
- Room Acoustics Treatment: Addressing the acoustics of the mixing environment can help achieve a more accurate sound representation. Soundproofing and acoustic panels can reduce reflections and standing waves, allowing for clearer monitoring and mixing.