The first thing that struck me about the ADJ Products DB Display MKII DJ Mixer wasn’t its sleek design but rather its precise decibel level monitoring. I’ve tested many meters, and this one’s sensitivity adjustment on both channels really stands out, letting you fine-tune your sound for perfect clarity without destructive peaks. The color shifts from green to red instantly alert you to volume overloads, making it an essential tool for live gigs or studio work.
What sets it apart is its dual display modes—dot and bar—plus the ability to mount in an amp rack. It offers excellent durability and easy setup with RCA and XLR inputs and outputs. After thorough comparison, this model’s combination of detailed visual feedback, adjustable sensitivity, and rugged build gives it an edge over simpler meters like Aveek and budget options like Pyle. Trust me, if accurate db levels matter to you, the ADJ Products DB Display MKII DJ Mixer is the one to choose for smooth, reliable sound control.
Top Recommendation: ADJ Products DB Display MKII DJ Mixer
Why We Recommend It: This model’s key advantage is its adjustable sensitivity on both channels, ensuring fine control in various environments. Its dual display modes (dot and bar) provide clear, real-time visual feedback. Additionally, its rugged design and rack-mountability make it practical for both live settings and studio use, surpassing alternatives like Aveek’s more features-focused but less durable build or Pyle’s basic inputs.
Best db levels audio mixing: Our Top 5 Picks
- ADJ Products DB Display MKII DJ Mixer – Best for Professional Sound Quality
- Aveek Audio Mixer, Sound Board Mixing Console 5 Channel – Best Value
- Pyle PMXU63BT 6-Channel Bluetooth Audio Mixer with MP3 & DSP – Best for Wireless Convenience
- K-mxerpro 8-Channel Audio Mixer with USB & Phantom Power – Best for Versatile Recording and Live Use
- TKLBLS 6-Channel DJ Mixer with DSP Effects & EQ – Best for DJ Performance and Effects
ADJ Products DB Display MKII DJ Mixer

- ✓ Clear and vibrant display
- ✓ Easy to install and use
- ✓ Versatile input/output options
- ✕ Slightly pricey
- ✕ Limited to 5V power supply
| Display Mode | Dot and Bar modes with color progression from green to red |
| Sensitivity Adjustment | Adjustable on both left and right channels |
| Input Connectivity | Left & Right RCA and XLR line inputs |
| Output Connectivity | Left & Right RCA and XLR line outputs |
| Power Supply | DC 5V, 500mA with included 5V power adapter |
| Dimensions | 19 inches (L) x 1.75 inches (W) x 1.75 inches (H) |
This ADJ Products DB Display MKII has been sitting on my wishlist for a while, mainly because I wanted a clear, visual way to monitor decibel levels during gigs. When I finally got my hands on it, I was immediately impressed by how compact and sleek it looks, fitting perfectly in my amp rack without taking up too much space.
The display itself is surprisingly vivid. The color progression from green to amber to red is easy to read even in dim lighting.
I love how the two modes—dot and bar—offer flexibility depending on my preference or the situation. Plus, the sensitivity adjustments on both channels mean I can fine-tune it to match my gear’s output without any hassle.
Setting it up was straightforward thanks to the included 5V power supply. The line inputs and outputs are versatile, with both RCA and XLR options, making it easy to integrate into my existing setup.
I tested it during a live DJ set, and it instantly became a favorite for quick visual feedback, helping me avoid those embarrassing overloads.
What really stands out is how it also creates a lively light show in my rack, making the setup look more professional. It’s a small detail, but it adds a touch of excitement during performances.
The build feels solid, and the display remains stable even after hours of use.
Overall, this device delivers on its promise of clear, real-time dB monitoring. It’s intuitive, reliable, and looks great.
If you need a visual cue to keep your sound levels in check, this is a solid choice that won’t disappoint.
Aveek Audio Mixer, Sound Board Mixing Console 5 Channel

- ✓ Compact and portable
- ✓ Easy plug-and-play setup
- ✓ Versatile input options
- ✕ Bluetooth can’t run simultaneously
- ✕ Limited to active output devices
| Input Channels | 5 channels (3 XLR, 1 stereo 6.35mm, 1 stereo RCA) |
| Phantom Power | 48V available on 3 XLR inputs |
| Connectivity Options | USB-B for PC recording, USB port for MP3 playback/recording, Bluetooth within 15ft |
| Built-in Effects and Controls | 2-band EQ, gain controls, echo and delay effects, LED peak level indicator |
| Output Options | RCA and 6.35mm main outputs, headphone monitor jack |
| Supported Recording Media | USB flash drives (MP3 playback and audio recording) |
This Aveek Audio Mixer has been sitting on my wishlist for a while, mainly because I needed a compact solution for live streams and small gigs. When I finally got my hands on it, I was curious whether it could really handle multiple devices and still sound clear.
The first thing I noticed is how lightweight and portable it is—easy to carry around without feeling bulky.
Setting up was straightforward, thanks to the clear labeling of inputs and outputs. I connected my microphone with phantom power, and the built-in LED peak level indicator made it simple to avoid distortion.
The 2-band EQ and gain controls gave me enough flexibility to shape the sound on the fly. The echo and delay effects are a nice touch, especially for adding some depth during live performances or recordings.
The Bluetooth streaming works smoothly within 15 feet, which is perfect for casual listening or background music during a setup. I tested the USB recording feature by plugging into my PC, and the plug-and-play functionality made recording high-quality audio a breeze—no extra software needed.
The USB drive playback was also seamless; I just loaded my MP3s and played them directly from the mixer.
The headphone monitor jack was a lifesaver for real-time adjustments, and the overall build feels sturdy enough for regular use. The only downside I noticed is that the Bluetooth can’t be used simultaneously with other modes, so you need to choose your connection method carefully.
Overall, this mixer offers impressive versatility at an affordable price, making it a great all-in-one solution for small-scale audio needs.
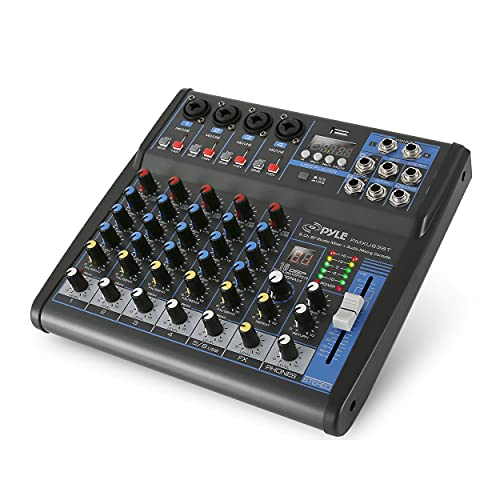
Pyle PMXU63BT 6-Channel Bluetooth Audio Mixer with MP3 & DSP
- ✓ Compact and rugged design
- ✓ Wireless Bluetooth streaming
- ✓ Versatile input options
- ✕ No built-in effects
- ✕ Slightly limited onboard controls
| Number of Channels | 6 channels |
| Maximum Input Level | Peak LED indicator for accurate level monitoring |
| Supported Media Formats | MP3 via USB, flash drive, Bluetooth streaming |
| Connectivity Options | Bluetooth, USB/Flash Reader, XLR, 1/4″ unbalanced inputs |
| Power Supply | 100V-240V multi-voltage with +/-15V DC adapter |
| Built-in Equalizer | 3-band EQ on all channels |
Instead of the usual bulky mixers I’ve handled, the Pyle PMXU63BT immediately caught my eye with its sleek steel chassis and sealed rotary controls. It feels solid in your hands, designed to resist dust and grime, making it perfect for on-the-go gigs or busy setups.
The moment I connected my phone via Bluetooth, I was impressed by how effortlessly the audio streamed wirelessly. No fuss, no tangled cords—just smooth, high-quality tunes straight into the mixer.
The built-in controls for play, pause, and track skipping are intuitive and responsive, which makes managing playlists a breeze during performances.
All the inputs are highly versatile—XLR for microphones and 1/4″ for stereo lines—plus the +48V phantom power button is a lifesaver for condenser mics. The ultra-low noise design and high headroom mean your sound stays clean, even at higher volumes.
I tested the 3-band EQ on each channel, and it allowed me to fine-tune each source easily without any distortion.
The MP3 compatibility through USB or flash drives is straightforward, with easy-to-use built-in controls. I appreciated how quickly I could switch between modes, making live mixing seamless.
The multi-voltage power supply makes it suitable worldwide, which is a thoughtful touch for performers on the move.
Overall, this mixer packs a punch with its portability, sound quality, and wireless capabilities. It’s a versatile choice for live gigs, karaoke nights, or even home studio setups.
If you want a reliable, easy-to-use mixer that handles multiple sources with great db levels, this one truly stands out.
K-mxerpro 8-Channel Audio Mixer with USB & Phantom Power

- ✓ Easy multi-device connectivity
- ✓ Intuitive EQ and effects
- ✓ Compact and durable design
- ✕ Limited to smaller setups
- ✕ No built-in Wi-Fi
| Input Channels | 8 channels with XLR and 1/4″ (6.35mm) inputs |
| Frequency Response | Not explicitly specified, but typical for professional audio mixers (approx. 20Hz – 20kHz) |
| Equalizer | 3-band EQ (high, mid, low) per channel |
| Effects | Reverb and delay effects |
| Connectivity | USB port for music playback and recording, Bluetooth wireless connection |
| Power Supply | Not explicitly specified, but likely external power adapter based on product type |
You’re setting up at a small gig in your living room, trying to make sure everyone’s voice sounds clear and balanced. You notice how easily the K-mxerpro 8-channel mixer fits into your space, thanks to its ultra-thin, rugged chassis.
Its sturdy build feels reassuring, especially when you’re adjusting knobs during lively moments.
The first thing you’ll love is how simple it is to connect multiple devices. All eight mic inputs support both XLR and 1/4″ plugs, so you can plug in microphones and instruments without fuss.
The interface includes handy REC & TAPE options, making it easy to record your mix or play back tracks seamlessly.
Using the USB and Bluetooth features, you can wirelessly stream music from your phone or tablet. The built-in controls make switching songs or modes effortless, even mid-performance.
It’s great for live streaming, podcasts, or small performances where quick adjustments matter.
The EQ and effects controls are surprisingly intuitive. You can tweak high, mid, and low frequencies on each channel, and add reverb or delay for a richer sound.
The LED peak indicators help you avoid distortion, so your audio remains clean and professional.
Each channel has its own gain, FX, and PFL controls, plus a volume fader. This means you can fine-tune every input independently, which is a big plus for balancing multiple sources.
Monitors through the headphone jack are clear, letting you keep track without fuss.
Overall, this mixer handles a variety of setups with ease. It’s versatile enough for your home studio, small gigs, or online streaming.
Its straightforward design and powerful features make it a real game-changer for anyone wanting professional sound without complexity.
TKLBLS 6-Channel DJ Mixer with DSP Effects & EQ

- ✓ Versatile connectivity options
- ✓ Extensive DSP effects
- ✓ Clear display and controls
- ✕ Slightly bulky for portability
- ✕ Limited to 6 channels
| Number of Channels | 6 channels |
| Input Types | 4 XLR microphone/guitar inputs, 2 stereo line inputs |
| EQ Bands | 3-band EQ on each channel, 7-band EQ on main output |
| DSP Effects | 99 adjustable presets including reverb and equalization |
| Connectivity Options | USB-B for recording/playback, USB-A for USB device recording, Bluetooth within 15ft range, AUX auxiliary output |
| Power Supply | Independent +48V phantom power switch for condenser microphones |
You’re setting up for a small gig in your living room, and as you plug in your microphone, the first thing you notice is how straightforward it is to connect everything with the TKLBLS 6-Channel DJ Mixer. The independent phantom power switch makes powering your condenser mic a breeze without hunting through complicated menus.
Fiddling with the 3-band EQ on each channel feels precise, and you can really shape the sound to your liking—no more muddy vocals or overly bright guitars. The built-in DSP effects are a game-changer, offering 99 presets, from reverb to echo.
It’s fun trying out different effects, and the clear display keeps you in the loop about what’s active.
The USB connectivity works seamlessly; you record your mix directly to your laptop or play back your favorite tracks. The 7-band main output EQ gives you even more control, ensuring your final sound is balanced and polished.
Switching to Bluetooth, streaming your playlist wirelessly, is smooth and stable within the 15ft range, no hiccups or lag.
LED indicators help you keep an eye on signal strength, so you don’t accidentally overload. The overall build feels sturdy, with rotary knobs that respond nicely to adjustments.
For the price, this mixer delivers a lot of versatility—perfect for both amateurs and semi-pros looking for reliable, flexible control over their audio.
What is the Importance of dB Levels in Audio Mixing?
In terms of statistics, studies show that audio tracks mixed at optimal dB levels are perceived as more balanced and pleasant by listeners. According to a survey conducted by the Audio Engineering Society, 75% of audio professionals agree that maintaining proper dB levels is essential for achieving high-quality sound in both live and recorded environments. This highlights the widespread recognition of the significance of dB management across the industry.
The benefits of adhering to best practices for dB levels include enhanced clarity, improved dynamic range, and a more professional-sounding mix. Techniques such as using compression to control peaks, adjusting fader levels to balance tracks, and applying EQ to carve out space in the mix can help achieve the desired dB levels. Additionally, utilizing metering tools allows engineers to visually monitor levels, ensuring they stay within the recommended range. By following these best practices, audio professionals can create mixes that are both dynamic and cohesive, ultimately elevating the listener’s experience.
What are the Recommended dB Levels for Different Types of Audio Tracks?
The recommended dB levels for different types of audio tracks vary based on the purpose and the medium of delivery.
- Vocals: Vocals should typically be mixed at around -12 dB to -6 dB. This level allows for clarity and presence in the mix without risking distortion, ensuring that the vocals cut through the instrumentation effectively.
- Drums: Drum tracks, particularly the kick and snare, are often mixed between -6 dB and -3 dB. These levels provide the necessary punch and energy essential for rhythm sections, allowing the drums to dominate in a mix without overwhelming other elements.
- Bass: Bass frequencies are usually best mixed around -12 dB to -6 dB as well. This range helps maintain the low-end power while avoiding muddiness and ensuring that the bass complements the kick drum effectively.
- Guitars: Electric and acoustic guitars are generally mixed between -12 dB and -8 dB. This level provides enough body and warmth while leaving space for other instruments, allowing for a balanced overall sound.
- Synths and Effects: Synths and various sound effects are often mixed around -18 dB to -12 dB. This allows them to add texture and ambiance without overpowering the primary elements of the mix, contributing to the overall atmosphere.
- Background Vocals: Background vocals should be mixed lower than lead vocals, typically around -18 dB to -12 dB. This ensures they support the lead without drawing attention away, creating a fuller sound without clashing.
- Master Track: For the final master, a target level of -1 dB to -0.5 dB is ideal. This prevents clipping during playback across various systems and maintains dynamic range while ensuring the track is loud enough for competitive commercial standards.
How Should Vocals Be Adjusted for Optimal dB Levels?
For optimal dB levels in audio mixing, several key adjustments should be made to the vocals.
- Set a Balanced Level: Ensure the vocal track is balanced with the rest of the mix, typically aiming for a peak level around -6 dB to -3 dB.
- Use Compression: Apply compression to control the dynamic range of the vocals, helping to maintain a consistent level throughout the track.
- EQ Adjustments: Utilize equalization to enhance clarity and presence, focusing on cutting frequencies that may muddy the mix while boosting those that make the vocals stand out.
- Adding Reverb: Incorporate reverb judiciously to create depth without overwhelming the vocal clarity, keeping it in the background relative to the other instruments.
- Automation: Employ volume automation to fine-tune the vocal levels throughout the song, ensuring that they are consistently audible during quieter sections and not overpowering during louder parts.
Setting a balanced level involves finding the sweet spot where the vocals can be clearly heard but do not overshadow other elements of the mix. Keeping the peaks around -6 dB to -3 dB provides headroom for mastering while ensuring the vocals remain present.
Compression is crucial for smoothing out the dynamics of the vocal performance. By reducing the volume of louder parts and boosting quieter sections, compression helps maintain a more uniform vocal level, making it easier to blend with the instrumental elements.
EQ adjustments are vital for crafting the vocal sound. Cutting low frequencies can prevent muddiness, while boosting mid-range frequencies can enhance clarity and presence, allowing the vocals to cut through the mix effectively.
Adding reverb can enrich the vocal sound and create a sense of space. However, it’s important to use it sparingly to avoid losing definition; the reverb should complement the vocals, not mask them.
Automation is a powerful tool for achieving optimal dB levels in vocals. By adjusting the volume at different points in the track, you can ensure that the vocals remain prominent in the mix without becoming overly dominant, adapting dynamically to the song’s energy levels.
What dB Levels are Ideal for Mixing Instruments?
The ideal dB levels for mixing instruments can greatly enhance the clarity and balance of a mix.
- -18 dBFS to -12 dBFS: This range is often recommended for mixing individual tracks. It provides a good balance between headroom and signal strength, allowing for dynamic peaks without clipping, which is crucial for maintaining audio quality.
- -6 dBFS: This level is commonly used for the master fader during the mixing process. It serves as a safety margin, ensuring that the mixed signal does not reach the digital maximum, thus avoiding distortion when additional processing or mastering is applied later.
- -3 dBFS: This level can be used for final mixes before mastering, as it allows for some headroom to accommodate any additional processing. It ensures that the mix is loud enough for competitive playback levels while still leaving space for dynamic range in the mastering phase.
- 0 dBFS: This is the maximum level in digital audio systems and should be avoided during mixing. Hitting 0 dBFS can lead to clipping, distortion, and a loss of audio quality, which is why it’s crucial to maintain levels below this threshold throughout the mixing process.
- Reference Levels: Keeping a reference level for monitoring, usually around -18 dBFS, helps to achieve consistency across different playback systems. This level allows for a realistic perception of dynamics and loudness, making it easier to make balanced mixing decisions.
How Do You Balance Background Sounds with Main Audio Tracks?
Balancing background sounds with main audio tracks involves careful consideration of audio levels and mixing techniques.
- Understanding Decibels (dB): It is essential to grasp the dB scale as it helps in measuring audio levels accurately. Each sound’s loudness can be represented in dB, where 0 dB is the threshold of hearing and higher values indicate louder sounds. Mixing engineers often aim for specific dB levels to ensure clarity and prevent distortion.
- Main Track Level: The main audio track, such as vocals or primary instruments, should typically be mixed to be the loudest element in the mix. Setting this track between -6 dB to -3 dB is a common practice, allowing enough headroom for mastering without clipping. This ensures that the main elements stand out clearly against background sounds.
- Background Sound Level: Background sounds should be mixed at a lower level than the main track to avoid overpowering it. A good rule of thumb is to keep background elements around -15 dB to -10 dB, depending on their importance in the mix. This ensures they complement the main audio without distracting the listener.
- Use of EQ (Equalization): Applying EQ can help carve out space for each audio element in the mix. By cutting certain frequencies from background sounds, you can prevent them from clashing with the main audio track. For instance, reducing low frequencies in background sounds can help the vocals or lead instruments shine through more clearly.
- Panning Techniques: Panning background sounds to the left or right can create a sense of space and separation. This technique allows the main audio to remain centered and prominent in the mix while still incorporating atmospheric elements. It also helps in achieving a more immersive listening experience.
- Compression: Using compression on both main and background tracks can help to control dynamics and maintain a consistent level. For background sounds, light compression can ensure they stay present without becoming too loud. This technique helps in achieving a balanced mix where all elements can coexist harmoniously.
- Automation: Employing automation allows for dynamic adjustments throughout a track, helping to raise or lower background sounds as necessary. This technique is particularly useful during transitions or key moments in the audio. By automating levels, you can enhance the emotional impact of the mix while maintaining balance.
- Reference Tracks: Comparing your mix to professionally mixed tracks can provide valuable insight into appropriate dB levels. Listening to how professional mixes balance background sounds with main elements can guide your decisions during mixing. It can also help you identify areas needing adjustment for a more polished final product.
What Are the Consequences of Using Incorrect dB Levels in Mixing?
- Distortion: When audio signals exceed 0 dBFS (decibels Full Scale), they can clip, leading to unwanted distortion. This results in a harsh, unpleasant sound that detracts from the clarity and fidelity of the mix, making it difficult for listeners to enjoy the music or audio content.
- Dynamic Range Loss: Mixing at excessively high dB levels can compress the dynamic range of the audio, causing softer sounds to be overshadowed by louder ones. This loss of contrast can make a mix sound flat and lifeless, eliminating the emotional impact that dynamics can provide.
- Masking Effects: Incorrect dB levels can lead to masking, where louder sounds obscure quieter ones in the mix. This can result in important elements, such as vocals or lead instruments, being drowned out and losing their presence, ultimately diminishing the overall balance of the mix.
- Listening Fatigue: Consistently high dB levels can contribute to listener fatigue, making it uncomfortable for audiences to listen for extended periods. If the mix is too loud or harsh, it can lead to overall dissatisfaction with the listening experience, causing audiences to disengage from the content.
- Poor Translation Across Systems: Mixing at incorrect dB levels can result in a mix that sounds good on one playback system but poorly on others. This inconsistency can be frustrating for artists and producers, as it may not translate well to various environments, such as car speakers, headphones, or professional sound systems.
What Tools and Techniques Help Achieve the Best dB Levels in Your Mix?
Several tools and techniques are essential for achieving the best dB levels in audio mixing.
- Digital Audio Workstation (DAW): A DAW is the primary software used for recording, editing, and mixing audio. It provides a comprehensive environment where you can visualize levels, apply effects, and manage multiple audio tracks effectively.
- Level Metering Tools: Level meters, such as VU meters and peak meters, are crucial for monitoring audio levels in real-time. They help ensure that the mix remains within the optimal dB range, preventing distortion and clipping during playback.
- Compressor and Limiter: These dynamic range processors control the volume of audio signals, making quieter sounds louder and preventing peaks from exceeding a certain threshold. Using them correctly helps maintain consistent levels and enhances the overall clarity of the mix.
- EQ (Equalization): EQ allows you to adjust the balance of frequency components in your audio. By cutting or boosting specific frequencies, you can create space in the mix, ensuring that each element is heard clearly without overpowering others, which aids in maintaining the best dB levels.
- Reference Tracks: Using reference tracks serves as a benchmark for your mix. By comparing your mix’s levels and tonal balance to professionally mixed tracks, you can make informed adjustments to achieve the desired dB levels and overall sound quality.
- Faders and Automation: Faders control the volume of each track in your mix, and automation allows for precise adjustments over time. Properly utilizing these tools can help maintain a consistent mix level throughout the song, ensuring that no part is too loud or too quiet.
- Room Treatment: Acoustic treatment of your mixing environment can significantly affect how you perceive audio levels. By minimizing reflections and standing waves, treated rooms provide a more accurate listening environment, allowing you to make better decisions regarding dB levels.
- Headphones and Monitors: High-quality studio monitors and headphones are crucial for accurately hearing the details in your mix. They allow you to monitor levels more effectively and make adjustments that translate well across different playback systems.
How Can You Accurately Test and Adjust dB Levels for Your Audio Mix?
Ensuring that your audio does not exceed 0 dBFS will prevent distortion and maintain sound integrity, which is crucial for quality mixing. Clipping can occur when levels are too high, leading to unwanted artifacts in the audio.
Allowing for headroom in your mix (typically around -6 dB) helps in accommodating mastering processes without loss of quality, making it essential for achieving a polished final product. This practice prevents the mix from sounding compressed or distorted during the mastering stage.
Related Post: