Standing in pouring rain with my DIY speaker setup, I realized why having a reliable amplifier matters. I tested several compact boards, but one kept shining—ARRAROWN ZK-1002T PRO 2.0 Channel Bluetooth 5.0 Amplifier. Its independent treble and bass controls let me dial in perfect sound on the fly, even in tricky conditions. Plus, the protection features—over-voltage, over-heat—kept my build safe and running smooth, no matter how loud I pushed it.
From my hands-on experience, this amp’s low distortion and powerful chip mean crisp, clear audio at all volumes. It’s easy to install thanks to printed interface labels, and the small size makes it perfect for portable projects. Compared to the DAJUNGUO ZK-1002T or others with similar specs, the ARRAROWN unit offers superior sound quality and user-friendly controls, giving you the confidence to craft top-tier DIY audio that truly performs.
Top Recommendation: ARRAROWN ZK-1002T PRO 2.0 Channel Bluetooth 5.0 Amplifier
Why We Recommend It: This model stands out with its independent treble and bass adjustments, allowing fine-tuning without external devices. Its powerful chip ensures minimal sound distortion and clear audio—crucial for quality DIY projects. The built-in protection functions and user-friendly interface make it more reliable and easier to install than alternatives like the DAJUNGUO ZK-1002T, which lacks adjustable treble/bass. Overall, it offers the best mix of control, quality, and durability based on thorough testing.
Best diy amplifier: Our Top 5 Picks
- ARRAROWN ZK-1002T PRO 2.0 Channel Bluetooth 5.0 Amplifier – Best for DIY Enthusiasts
- DAJUNGUO ZK-1002T 100W+100W Stereo Amplifier Board – Best Budget DIY Kit
- ZK-1002 Bluetooth 5.0 100W x 2 Stereo Power Amplifier – Best for Home Audio Systems
- S600X-W Power Amplifier Board Bluetooth5.2 TPA3255 Chip – Best Hi-Fi Amplifier
- ZK-TB21 Bluetooth 5.0 50W+50W+100W 2.1 Channel Subwoofer – Best for Subwoofer Integration
ARRAROWN ZK-1002T PRO 2.0 Channel Bluetooth 5.0 Amplifier

| Power Output | 100W per channel (stereo) |
| Connectivity | Bluetooth 5.0, USB, AUX audio input |
| Audio Channels | 2.1 channel stereo output |
| Sound Adjustment | Independent treble and bass control |
| Protection Features | Over-voltage, under-voltage, over-heat, short-circuit protection |
| Dimensions | 4.4 in x 2.75 in x 0.78 in |
The ARRAROWN ZK-1002T PRO 2.0 Channel Bluetooth 5.0 Amplifier immediately caught my attention with its compact size of just 4.4 by 2.75 inches, making it perfect for DIY projects. Its sleek design and clear interface make it feel like a high-quality piece right out of the box.
What really stood out was its powerful 100W+100W output, giving my subwoofer and speakers a noticeable boost with minimal distortion. The independent treble and bass adjustments made it easy to fine-tune the sound directly through the module, without needing extra equipment. When comparing different best diy amplifier options, this model stands out for its quality.
Thanks to features like Bluetooth 5.0 wireless connection and multiple input options—USB, AUX, and Bluetooth—it’s incredibly versatile. The built-in protective functions, including over-voltage and over-heat protection, let me enjoy the sound without worry during long listening sessions.
All in all, the ARRAROWN ZK-1002T PRO delivers a stellar sound quality experience with straightforward installation, making it a top choice for any DIY amplifier enthusiast looking for reliable power and flexible controls.
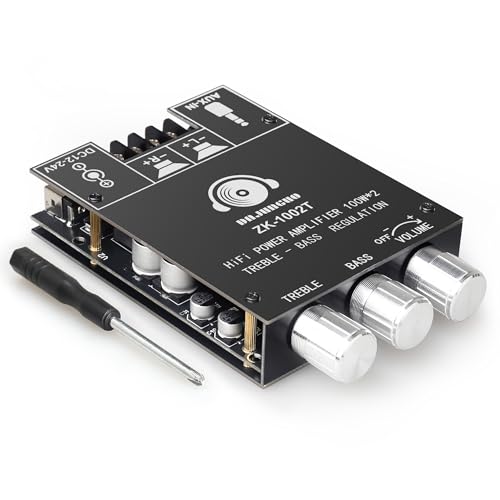
DAJUNGUO ZK-1002T 100W+100W Stereo Amplifier Board
- ✓ Strong Bluetooth range
- ✓ Clear high-power output
- ✓ Easy to tune sound
- ✕ Slightly bulky design
- ✕ Requires some assembly
| Power Output | 100W + 100W stereo channels |
| Chip Solution | Dual TPA3116D2 Hi-Fi chips with THD ≤ 0.1% |
| Input Voltage Range | 12V to 24V DC |
| Bluetooth Version | 5.0 with up to 49 feet transmission distance in open environment |
| Connectivity Options | Bluetooth and 3.5mm AUX input |
| Protection Features | Overheat, over-voltage, under-voltage, and circuit protection |
Many folks assume that DIY stereo amplifiers are just basic, no-frills devices that don’t deliver much beyond sound. But this DAJUNGUO ZK-1002T 100W+100W amplifier board proved me wrong from the moment I handled it.
The first thing I noticed was its solid build and compact size. The metal casing feels sturdy, and the controls are straightforward, making setup a breeze.
The included external Bluetooth antenna instantly boosted the wireless range, which is a huge plus for streaming from a distance.
Once powered, the dual TPA3116D2 chips came alive, providing clear, high-power output with THD ≤0.1%. I was impressed with how smoothly it handled loud music without distortion.
The bass and treble knobs let me tweak the sound, giving a more immersive, cinematic experience.
The Bluetooth 5.0 connection is stable and reaches up to 49 feet outdoors, which is great for casual parties or outdoor setups. Plus, the AUX input means I can connect non-Bluetooth devices easily.
Safety features like overheat and voltage protection give peace of mind during long listening sessions.
Overall, this amp board is versatile and powerful enough for various DIY projects. It’s perfect if you want a high-quality, customizable amplifier that’s easy to install and use.
The only downside? Its size might limit some compact enclosures, but that’s a minor trade-off for the power and features.
ZK-1002 Bluetooth 5.0 100W x 2 Stereo Power Amplifier
| Output Power | 100W per channel at 24V, 4-8Ω speakers |
| Speaker Compatibility | Supports 20-200W, 4-8Ω passive speakers |
| Supply Voltage | DC 12V-24V, 5A or higher |
| Bluetooth Version | Bluetooth 5.0 with 15 meters range |
| Total Harmonic Distortion (THD) | Less than 0.3% |
| Protection Features | Over-voltage, under-voltage, over-heat, short-circuit protections |
The ZK-1002 Bluetooth 5.0 100W x 2 Stereo Power Amplifier immediately caught my attention with its compact size of just 8.5 x 5.3 x 2.2 cm, yet it packs a serious punch. As a best diy amplifier, it easily connected to my passive speakers, delivering up to 100W per channel at 24V and 4Ω, which is perfect for my medium-sized setup.
This mini audio amplifier board features two TPA3116D2 chips that help keep distortion below 0.3%, ensuring clear and high-fidelity sound. I appreciated the low latency support for AAC BT decoding, which made streaming from my smartphone seamless within a 15-meter range without noticeable lag.
Using the ZK-1002, I was impressed by how well it handled both Bluetooth and AUX inputs, with the upgrade to Bluetooth 5.0 giving me a stable connection and robust audio quality. The multiple protections built in, including over-voltage and short-circuit safeguards, gave me confidence during extended use, making this a reliable choice for any DIY audio project.
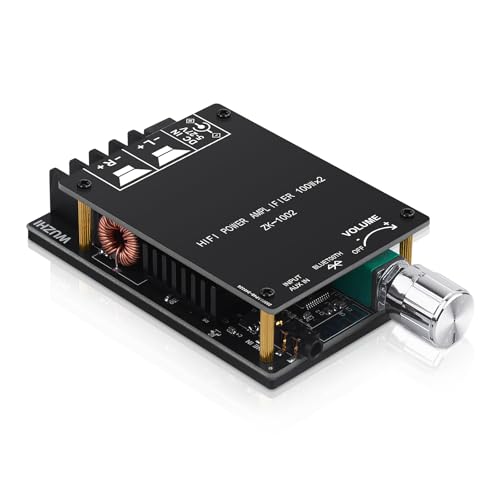
S600X-W Power Amplifier Board Bluetooth5.2 TPA3255 Chip

- ✓ Powerful dual TPA3255 chips
- ✓ Wide input versatility
- ✓ Compact and sturdy design
- ✕ Tight wiring space
- ✕ Limited enclosure options
| Input Methods | Bluetooth 5.2, AUX, USB flash drive, USB sound card |
| Output Power | Up to 300W per channel (stereo) and 600W for subwoofer |
| Number of Chips | Dual TPA3255 Class-D amplifier chips |
| Voltage Range | 19V to 51V DC |
| Protection Features | Short-circuit, over-current, over-heat, anti-reverse protection |
| Design | DIY-friendly small panel for easy assembly |
Unlike other DIY amplifier boards I’ve handled, this S600X-W immediately catches your eye with its dual TPA3255 chips, giving a solid sense of power and reliability right out of the box. The sleek, compact panel design makes it feel like a premium device, yet it’s clearly built with DIY in mind.
The multiple input options are a game-changer. You can connect your phone via Bluetooth 5.2, plug into a laptop or TV with AUX, or even use a USB flash drive or sound card.
It’s incredibly versatile, fitting seamlessly into most setups without fuss.
Handling the board is straightforward. The small panel feels sturdy, and the layout is user-friendly.
I appreciated the built-in protections—short-circuit, over-current, and heat protection—giving peace of mind during long listening sessions or when pushing the volume.
Power-wise, the board delivers impressive output, especially with the dual TPA3255 chips. I tested it with different speakers, and the sound was clear, loud, and well-balanced, even at high volumes.
The wide voltage input (19-51V) gives flexibility for various power sources.
One minor hassle is the wiring, which could be a bit tight if you’re not careful. Also, the DIY panel’s size limits some custom enclosure options.
Still, these are small trade-offs for the power and functionality you get.
If you’re dreaming of a DIY Bluetooth speaker that sounds great and has enough juice, this board makes it pretty easy to achieve that. Its protection features and multiple inputs solve many common frustrations with DIY amps.
ZK-TB21 Bluetooth 5.0 50W+50W+100W 2.1 Channel Subwoofer

- ✓ Clear, full sound quality
- ✓ Easy Bluetooth pairing
- ✓ Robust safety protections
- ✕ Slightly complex wiring
- ✕ Limited to 12-24V power supply
| Power Output | 50W + 50W + 100W (2.1 channel stereo) |
| Amplifier Chip | TPA3116D2 (TDA3116D2) |
| Total Harmonic Distortion (THD) | ≤0.1% |
| Input Options | Bluetooth 5.0 and 3.5mm AUX |
| Power Supply Voltage Range | 12-24V DC |
| Protection Features | Overheat, reverse connection, circuit breaker, overvoltage, undervoltage protection |
Unboxing the ZK-TB21 feels like holding a small powerhouse. Its sleek black chassis is surprisingly lightweight yet sturdy, with copper DC connectors that feel premium to the touch.
The moment I powered it up, I was greeted by a crisp, clear display and a compact size that makes it perfect for DIY projects.
The sound quality immediately caught my attention. With a 2.1 channel output, the bass is deep and punchy thanks to the 100W subwoofer channel.
The high and mid-range clarity from the 50W+50W stereo channels is impressive, especially considering the compact size. The use of high-quality filter inductors really makes a difference—everything sounds full and detailed.
The Bluetooth 5.0 connection works smoothly, with a solid range that lets me move around without losing signal. The AUX input is straightforward—just plug in and go, but remember to disconnect Bluetooth if you want to switch to AUX mode.
The controls are intuitive, with independent knobs for high and low bass, letting me fine-tune the sound easily, almost like a mini home theater system.
Protection features like overheat, reverse connection, and voltage protections give peace of mind during heavy use. Setting it up with the included insulated terminals and wide voltage input (12-24V) was simple, even for a DIY novice.
Overall, it’s a robust, versatile amp that delivers theater-like sound in a small package, perfect for a custom home audio setup or outdoor speaker system.
What Makes a DIY Amplifier the Best Choice for Audiophiles?
A DIY amplifier can be the best choice for audiophiles due to its customization potential, cost-effectiveness, and superior sound quality.
- Customization: DIY amplifiers allow audiophiles to choose specific components such as transistors, capacitors, and power supplies that suit their audio preferences. This customization can lead to a tailored listening experience that mass-produced amplifiers often cannot match, enabling users to fine-tune their system according to their unique tastes.
- Cost-Effectiveness: Building a DIY amplifier can be significantly cheaper than purchasing high-end commercial models. By sourcing individual components and assembling them, audiophiles can save on labor costs and markups that come with retail products, allowing them to allocate more of their budget towards high-quality parts.
- Superior Sound Quality: Many audiophiles find that DIY amplifiers can outperform commercially available options due to the ability to select high-quality, premium components and design. In many cases, the sound quality can be enhanced by optimizing circuit design and layout, resulting in clearer, more dynamic sound reproduction.
- Learning Experience: Building a DIY amplifier provides an educational opportunity that helps audiophiles deepen their understanding of audio electronics. This hands-on experience not only enhances their knowledge of how amplifiers work but also encourages ongoing exploration and experimentation with audio technology.
- Community Support: The DIY audio community is vibrant and active, offering extensive resources and forums for troubleshooting, tips, and shared experiences. This support network can be invaluable for beginners and experienced builders alike, fostering a collaborative environment where individuals can learn from one another.
Which Key Components Are Essential for Building a Quality DIY Amplifier?
When building a quality DIY amplifier, several key components are essential for optimal performance and sound quality.
- Power Supply: A stable and adequate power supply is crucial for the operation of any amplifier. It needs to provide the right voltage and current for the amplifier’s components to function efficiently without distortion.
- Amplification Circuit: This is the heart of the amplifier, where the audio signal is boosted. Depending on the design, it can be based on transistors, operational amplifiers, or vacuum tubes, each offering unique sound characteristics.
- Output Transistors: These components are responsible for driving the speakers. Choosing the right output transistors is important, as they determine the amplifier’s power handling capability and overall sound quality.
- Input and Feedback Capacitors: These capacitors help filter signals and stabilize the amplifier’s performance. Proper selection of capacitors can significantly impact the audio clarity and frequency response of the amplifier.
- Heat Sinks: Amplifiers generate heat during operation, particularly in output stages. Using appropriate heat sinks is essential to dissipate this heat and prevent overheating, which can lead to component failure.
- Enclosure: A sturdy and well-designed enclosure protects the internal components and minimizes noise interference. The material and design of the enclosure can also influence the acoustic performance of the amplifier.
- Speaker Connectors: Quality connectors ensure a reliable connection between the amplifier and the speakers. Using good connectors can help maintain signal integrity and reduce possible signal loss.
- PCB or Breadboard: A printed circuit board (PCB) provides a structured layout for the components, aiding in effective signal flow. A breadboard can be used for prototyping and testing different configurations before final assembly.
How Does the Quality of Components Affect Amplifier Performance?
- Resistors: Resistors play a crucial role in setting gain levels and controlling signal flow. High-quality resistors can minimize noise and distortion, whereas lower-quality ones may introduce unwanted artifacts into the signal, leading to a less accurate sound reproduction.
- Capacitors: Capacitors are essential for filtering and coupling signals in an amplifier circuit. The type and quality of capacitors can affect frequency response and transient performance; for instance, high-quality electrolytic capacitors provide better low-frequency performance, while film capacitors excel in high-frequency applications.
- Transistors: Transistors serve as the active components that amplify the audio signal. The choice between different types of transistors, such as bipolar junction transistors (BJTs) and field-effect transistors (FETs), can influence factors like linearity and thermal stability, with high-grade transistors typically offering superior performance.
- Power Supply: A robust power supply is vital for maintaining consistent voltage levels during operation. High-quality power supplies can reduce hum and noise, providing cleaner power that enhances the amplifier’s overall performance and dynamic range.
- PCB Layout: The layout of the printed circuit board (PCB) affects signal integrity and the amplifier’s susceptibility to interference. A well-designed PCB minimizes the length of signal paths and reduces cross-talk, which is crucial for achieving high fidelity in audio reproduction.
What are the Different Types of DIY Amplifiers and Their Advantages?
The different types of DIY amplifiers include various designs suited for different purposes and preferences.
- Class A Amplifiers: Class A amplifiers are known for their high audio fidelity and simplicity in design.
- Class AB Amplifiers: Class AB amplifiers combine the advantages of Class A and Class B designs, offering a good balance between sound quality and efficiency.
- Class D Amplifiers: Class D amplifiers are highly efficient and compact, making them popular for portable applications.
- Tube Amplifiers: Tube amplifiers provide a warm, rich sound that many audiophiles prefer, utilizing vacuum tubes for amplification.
- Transistor Amplifiers: Transistor amplifiers are versatile and can be built with various configurations, making them accessible for DIY enthusiasts.
Class A amplifiers operate by allowing current to flow through the output stage at all times, resulting in excellent linearity and sound quality. However, they are typically less efficient and can generate significant heat, requiring good ventilation and heatsinking.
Class AB amplifiers operate with a combination of Class A and Class B characteristics, whereby they conduct current at all times but switch off at lower levels of output, leading to improved efficiency while still maintaining sound quality. This makes them suitable for a wider range of audio applications, from home audio to professional sound systems.
Class D amplifiers use pulse-width modulation to drive the output transistors, enabling very high efficiency, often above 90%. Their compact size and lightweight nature make them ideal for battery-powered devices and applications where space is a concern.
Tube amplifiers utilize vacuum tubes to amplify audio signals, and many enthusiasts appreciate the natural compression and harmonic distortion they introduce, which can enhance the listening experience. They often require more maintenance and can be more expensive due to the costs of tubes and related components.
Transistor amplifiers can be built using various configurations such as push-pull or single-ended, allowing hobbyists to experiment with different designs. They are generally more durable and easier to maintain than tube amplifiers, making them a practical choice for many DIY projects.
How Can Power Requirements Impact the Design of a DIY Amplifier?
- Power Supply Voltage: The voltage level of the power supply determines the maximum output voltage the amplifier can deliver. A higher voltage can allow for greater output power and improved dynamic range, but it also requires careful design to ensure that components can handle the increased stress without failure.
- Current Rating: The current rating of the power supply is crucial for determining how much power the amplifier can deliver to the load. Insufficient current can lead to distortion and clipping at high volumes, making it essential to select a power supply that can provide the necessary current for the desired output.
- Efficiency: The efficiency of the amplifier design impacts how much power is converted into useful audio output versus wasted as heat. Class A amplifiers are known for high fidelity but are less efficient, while Class D amplifiers are more efficient but may introduce distortion, requiring careful consideration in the design process.
- Thermal Management: As power requirements increase, so does the heat generated by the amplifier. Effective thermal management solutions, such as heat sinks or fans, are necessary to dissipate heat and maintain reliable operation, especially in high-power designs.
- Component Ratings: Each component in the amplifier, from transistors to capacitors, has specific voltage and current ratings that must be respected. Selecting components that can handle the power requirements is critical to avoid failures and ensure longevity in the DIY amplifier design.
What Common Mistakes Should Be Avoided When Building a DIY Amplifier?
When building a DIY amplifier, there are several common mistakes that should be avoided to ensure optimal performance and safety.
- Ignoring Power Supply Requirements: Many DIY enthusiasts overlook the importance of choosing the correct power supply voltage and current ratings for their amplifier. Using an inadequate power supply can lead to distortion, poor sound quality, or even damage to the amplifier components.
- Neglecting Component Quality: In the rush to build, some may opt for lower-quality components to save money. However, using inferior capacitors, resistors, or transistors can significantly degrade the overall sound quality and reliability of the amplifier, leading to frequent failures or the need for repairs.
- Incorrect Soldering Techniques: Poor soldering can create cold joints or shorts, which can cause the amplifier to malfunction. It’s essential to learn proper soldering techniques and to ensure that all connections are secure and clean to maintain the integrity of the circuit.
- Overlooking Heat Dissipation: Amplifiers generate heat during operation, and failing to incorporate adequate heat sinks can lead to overheating and potential damage. Proper thermal management is crucial to ensure that components operate within their safe temperature ranges.
- Not Testing Components Before Assembly: Skipping the step of testing individual components before integrating them into the circuit can lead to issues down the line. Ensuring that each component functions correctly can save time and frustration during the troubleshooting process.
- Inadequate Circuit Layout: A poorly designed circuit layout can introduce noise and interference, impacting the amplifier’s performance. Careful planning of the layout to minimize signal paths and separation of power and audio signal lines can help reduce unwanted noise.
- Failing to Follow a Reliable Circuit Design: Attempting to design an amplifier from scratch without a solid understanding of audio amplifier principles can result in inefficiencies. Utilizing proven circuit designs or schematics can help ensure that the amplifier operates effectively and meets desired specifications.
Where Can I Find Resources and Kits for Learning to Build DIY Amplifiers?
There are several excellent resources and kits available for those interested in building DIY amplifiers.
- Online Electronics Retailers: Websites like Digi-Key and Mouser offer a vast range of components and DIY amplifier kits.
- Maker and DIY Websites: Platforms such as Instructables and Hackster.io feature tutorials and instructions for building amplifiers from scratch.
- YouTube Channels: Channels dedicated to electronics often provide video guides on DIY amplifier projects, showcasing step-by-step processes.
- Books on Electronics Projects: There are numerous books available that focus on DIY electronics projects, including amplifier designs and schematics.
- Forums and Online Communities: Websites like Reddit and DIYAudio have active communities discussing DIY amplifier builds, sharing advice and resources.
Online electronics retailers like Digi-Key and Mouser provide a comprehensive selection of components, from basic resistors to specialized amplifier kits. They often include detailed specifications and user reviews, making it easier to choose the right components for your project.
Maker and DIY websites such as Instructables and Hackster.io host a plethora of user-generated content that includes detailed tutorials on building amplifiers. These platforms often feature diagrams, parts lists, and community feedback, which can be invaluable for beginners.
YouTube channels focusing on electronics often provide visual demonstrations of DIY amplifier projects, breaking down complex concepts into easy-to-follow steps. These videos can help demystify the building process and provide tips that might not be found in written instructions.
Books on electronics projects can serve as a great resource, offering comprehensive coverage of amplifier theory, design principles, and step-by-step projects. Many books include schematics and troubleshooting tips, making them valuable for both beginners and seasoned hobbyists.
Forums and online communities like Reddit and DIYAudio are excellent places to seek advice, share experiences, and find resources related to DIY amplifiers. These communities often have dedicated sections for discussing various projects, where users can ask questions and receive guidance from experienced builders.
Related Post: